Understanding oven temperatures is a fundamental skill for any home cook or baker. Whether you’re aiming for a perfectly golden crust on a pie or a succulent, tender roast, the right temperature setting is paramount. This guide will demystify oven temperatures, helping you achieve optimal results for both sweet and savory dishes.
The Science Behind the Heat: Browning and Texture
|
Our Picks for the Best Crepe maker in 2026
As an Amazon Associate I earn from qualifying purchases.
|
||
| Num | Product | Action |
|---|---|---|
| 1 | Moss & Stone Electric Crepe Maker 8 Inch, Portable Crepe Maker & Hot Plate Cooktop On/Off Switch, Nonstick Coating, Automatic Temperature Control, Easy To Use For Pancakes, Blintz, Chapati |

|
| 2 | Gourmia 12” Crepe Maker – Nonstick Electric Griddle for Pancakes, Omelets & More, Precise Temp Control with Indicator Lights, Includes Spatula & Batter Spreader, Quick Cleanup, Stainless Steel Trim |
|
| 3 | Gourmia 8” Electric Crepe Maker – Nonstick Ceramic Surface, One-Touch Operation, Includes Batter Tray, Compact & Easy to Clean, Crepe, Pancake & Tortilla Maker |
|
| 4 | Nutrichef Electric Crepe Maker - 8-inch Nonstick Cooktop with On/Off Switch - Cooks Roti, Tortillas & Pancakes - Automatic Temperature Control & Cool Touch Handle - Includes Food Bowl, Whisk & Spatula |
|
| 5 | Baker's Friend Instant Crepe Maker with Handle, Electric Crepe Maker Machine, Crepera Electrica, 8 Inch Non-stick Cooking Surface, Aqua |
|
| 6 | Moss & Stone Electric Crepe Maker – 8” Portable Crepe Pan Nonstick with Dipping Plate, Auto Shut-Off, On/Off Switch, Even Heating & One Automatic Temperature Control – Compact Crepe Maker |
|
| 7 | Electric Crepe Maker 12'' & Griddle - Non-Stick Pan With Spreader for Roti, Tortilla, Blintzes, Pancakes - Adjustable Temperature, 1000W |
|
| 8 | 16 Inch Commercial Crepe Maker, Dual-Head, Dual Zone Temp Setting, Nonstick Pancake Griddle Machine, 50-300°C(120-570℉), 3400W, S.S. Shell, for Catering, Restaurant, Snack Stand, CE Certified |
|
| 9 | Moss & Stone 12” Electric Griddle Pan & Crepe Machine, Non-Stick Electric Crepe Maker with Adjustable Temperature, Includes Spreader & Spatula – Ideal for Pancakes, Blintzes & Tortillas |
|
| 10 | Nutrichef Electric Crepe Maker & Griddle Cooktop - Nonstick 12 Inch Aluminum Hot Plate with LED Indicator Lights & Adjustable Temperature Control - Wooden Spatula & Batter Spreader Included |
|
Different temperatures trigger different chemical reactions in your food, influencing both flavor and texture.
- Maillard Reaction: This is the browning reaction responsible for the rich, complex flavors and aromas in many savory dishes, such as roasted meats and vegetables. It typically occurs at temperatures above 300°F (150°C).
- Caramelization: This process involves the browning of sugars, creating sweet, nutty flavors. It also starts at temperatures generally above 300°F (150°C), though the specific temperature depends on the type of sugar.
- Moisture and Structure: High heat can create a crispy exterior, while lower, slower heat allows food to cook through evenly without drying out, particularly important for delicate items or larger cuts of meat.
Savory Sensations: Ideal Temperatures for Roasting and More
Savory cooking often involves higher temperatures to achieve desirable browning, crisp textures, and safe internal doneness.
- Slow Roasting (300-325°F / 150-160°C): This range is excellent for large cuts of meat, like roasts or braises, allowing them to cook slowly and become tender without drying out. This temperature also facilitates the Maillard reaction for flavorful browning over time.
- Moderate Roasting (375-400°F / 190-200°C): This is a versatile range for chicken, ensuring crispy skin, or for shorter-term roasting of vegetables and some baked savory dishes, like casseroles, to develop a golden crust.
- High-Heat Roasting (425-450°F / 220-230°C): Perfect for achieving deeply caramelized, crispy roasted vegetables, quick-cooking proteins, or puff pastry, where a rapid burst of heat is needed for optimal texture and color.
- Very High Heat (475-500°F / 245-260°C): Reserved for items like pizza and artisanal breads, where an extremely hot oven creates a quick rise and a wonderfully crisp crust before the gluten has a chance to fully set.
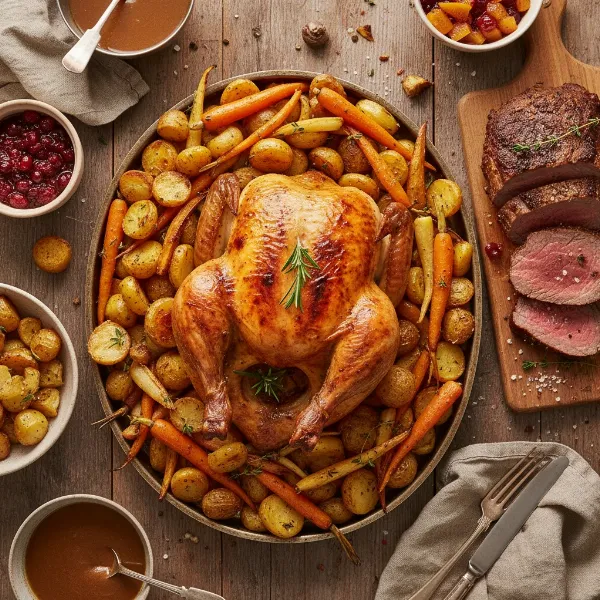 Assortment of perfectly roasted savory dishes like chicken, vegetables, and beef with golden crusts.
Internal Temperature Targets for Savory Foods: While oven temperature dictates the cooking environment, internal temperature is crucial for food safety and desired doneness in meats and poultry. Always use a meat thermometer.
- Poultry (Chicken, Turkey, Duck): 165°F (74°C)
- Pork (Roasts, Steaks, Chops): Medium 145°F (63°C), Well Done 160°F (71°C)
- Beef, Lamb, Veal: Rare 126°F (52°C), Medium 140°F (60°C), Well Done 160°F (71°C)
- Fish: 140°F (60°C)
Sweet Success: Baking and Confectionery Temperatures
Sweet baking generally requires more precise temperature control due to the delicate balance of ingredients like sugar, fat, and flour.
- Moderate Baking (325-350°F / 160-180°C): This is the sweet spot for most cakes, muffins, and quick breads. The moderate heat allows the interior to cook thoroughly without over-browning or burning the sugar-rich exterior. Delicate items like cheesecakes also benefit from lower temperatures, often around 325°F (160°C), to prevent cracking.
- Slightly Higher Baking (375-400°F / 190-200°C): Cookies often benefit from this range to achieve crisp edges and a golden finish.
- Confections: Candies and custards often rely on specific temperature ranges to achieve their unique textures. For example, jam setting point is around 230°F (110°C), while caramel can go as high as 320-350°F (160-177°C) for flan or cages. Chocolate tempering also involves precise temperature control for melting, cooling, and reheating.
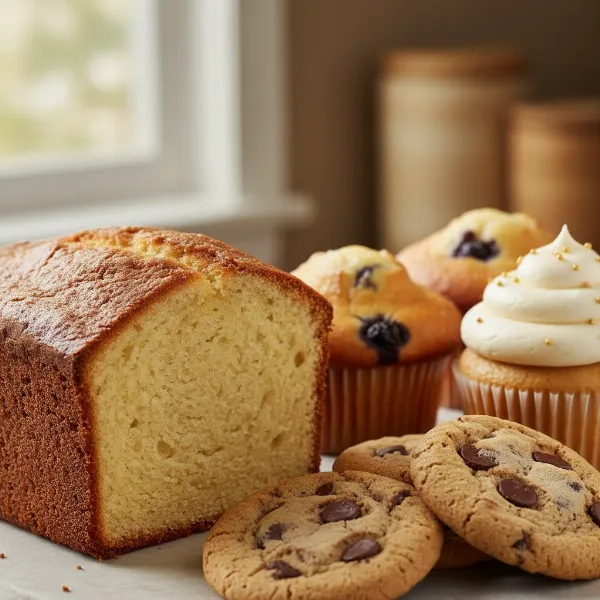 A collection of beautifully baked sweet goods including cakes, cookies, and pastries on a dessert table.
Tips for Temperature Mastery
- Preheat Thoroughly: Always allow your oven to fully preheat. This ensures consistent heat from the moment your food enters the oven. Many ovens signal when they’ve reached the set temperature, but it’s often wise to give it an extra 5-10 minutes.
- Know Your Oven: Ovens can vary. An inexpensive oven thermometer can help you verify your oven’s accuracy. If your oven runs hot or cold, adjust recipes accordingly.
- Fan-Assisted Ovens (Convection): Convection ovens circulate hot air, cooking food faster and often more evenly. Recipes typically suggest reducing the temperature by about 25-50°F (10-20°C) or reducing cooking time when using a convection setting.
- Multiple Dishes at Once: When cooking multiple items with different temperature requirements, prioritize the most delicate item or the one requiring the lowest temperature. The other dish may simply take longer to cook. Flavor transfer between sweet and savory items in the oven is generally not an issue unless a dish has an extremely strong aroma like garlic.
- Placement Matters: For most even baking, use the middle oven rack. Top racks are hotter, bottom racks are cooler.
By understanding these temperature guidelines and the principles behind them, you can confidently tackle any sweet or savory recipe, ensuring delicious and perfectly cooked results every time.