Few culinary frustrations rival the moment a perfectly golden crepe tears apart, stubbornly clinging to the cooking surface. You’ve mixed the batter, heated your crepe maker, and embarked on a delightful journey of thin, delicate pancakes, only to be met with sticky disappointment. If you’ve ever found yourself asking, “Why are my crepes sticking?”, you’re not alone. This common issue can turn a simple breakfast into a battle, but with the right knowledge and techniques, you can overcome it and achieve consistently flawless crepes that glide effortlessly off the plate.
Understanding the Basics of Crepe Making
At its heart, crepe making is a balance of heat, batter, and surface preparation. A successful crepe requires a dance between these elements to cook evenly, develop a beautiful golden hue, and release cleanly. When this delicate equilibrium is disrupted, sticking becomes the inevitable outcome. As a technician with over a decade of experience across all types of crepe makers, from compact home models to robust professional units, I’ve seen countless scenarios that lead to this exact problem.
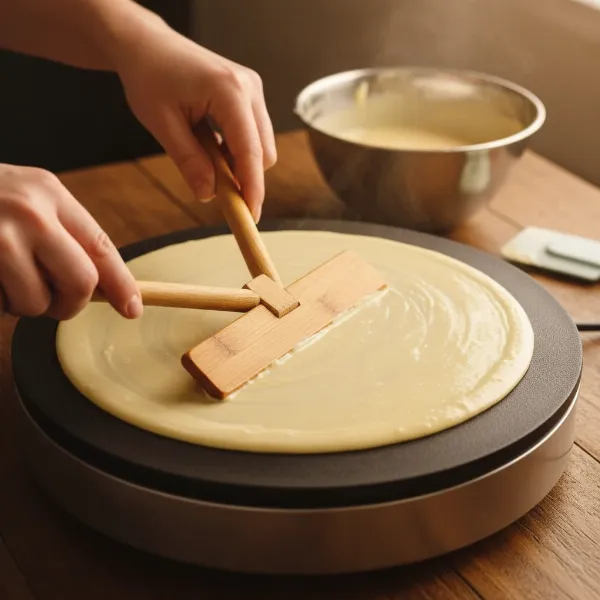 Hands spreading crepe batter on a hot griddle, illustrating balanced technique.
Common Culprits: Why Your Crepes Are Sticking
Before we dive into solutions, let’s pinpoint the usual suspects behind those stubborn crepes. Understanding the root cause is the first step toward perfecting your craft.
The Crepe Maker Plate Isn’t Ready
One of the most frequent reasons for sticking relates directly to the cooking surface itself.
- Improper Seasoning: For cast iron or non-coated crepe plates, a well-developed seasoning is your primary non-stick layer. If it’s new, worn, or uneven, your crepes will struggle to release. This is especially true for commercial-grade machines that rely heavily on a proper seasoning process to build up their non-stick properties over time.
- Incorrect Temperature: This is a double-edged sword. If the plate is too cold, the batter won’t cook quickly enough to form a cohesive structure before it has a chance to bond with the surface. If it’s too hot, the batter can cook too rapidly, charring and burning before it can set properly, leaving behind residue that causes the next crepe to stick. An infrared thermometer can tell you if your pan is around 400°F (204°C), but most home cooks rely on instinct. A small drop of water should sizzle and evaporate quickly, or a tiny dollop of batter should cook through in about 30 seconds, indicating the right heat.
- Insufficient or Excessive Greasing: While it seems counterintuitive, both too little and too much grease can cause problems. Too little fat means the crepe has no barrier to stick. Too much oil can lead to an oily residue that prevents proper browning and can even cause the crepe to “float” and stick to the spreader rather than the griddle.
|
Our Picks for the Best Crepe maker in 2026
As an Amazon Associate I earn from qualifying purchases.
|
||
| Num | Product | Action |
|---|---|---|
| 1 | Moss & Stone 12” Electric Griddle Pan & Crepe Machine, Non-Stick Electric Crepe Maker with Adjustable Temperature, Includes Spreader & Spatula – Ideal for Pancakes, Blintzes & Tortillas |

|
| 2 | Nutrichef Electric Crepe Maker & Griddle Cooktop - Nonstick 12 Inch Aluminum Hot Plate with LED Indicator Lights & Adjustable Temperature Control - Wooden Spatula & Batter Spreader Included |
|
| 3 | Baker's Friend Instant Crepe Maker with Handle, Electric Crepe Maker Machine, Crepera Electrica, 8 Inch Non-stick Cooking Surface, Aqua |
|
| 4 | 16 Inch Commercial Crepe Maker, Dual-Head, Dual Zone Temp Setting, Nonstick Pancake Griddle Machine, 50-300°C(120-570℉), 3400W, S.S. Shell, for Catering, Restaurant, Snack Stand, CE Certified |
|
| 5 | Electric Crepe Maker 12'' & Griddle - Non-Stick Pan With Spreader for Roti, Tortilla, Blintzes, Pancakes - Adjustable Temperature, 1000W |
|
| 6 | Gourmia 8” Electric Crepe Maker – Nonstick Ceramic Surface, One-Touch Operation, Includes Batter Tray, Compact & Easy to Clean, Crepe, Pancake & Tortilla Maker |
|
| 7 | Nutrichef Electric Crepe Maker - 8-inch Nonstick Cooktop with On/Off Switch - Cooks Roti, Tortillas & Pancakes - Automatic Temperature Control & Cool Touch Handle - Includes Food Bowl, Whisk & Spatula |
|
| 8 | Moss & Stone Electric Crepe Maker 8 Inch, Portable Crepe Maker & Hot Plate Cooktop On/Off Switch, Nonstick Coating, Automatic Temperature Control, Easy To Use For Pancakes, Blintz, Chapati |
|
| 9 | Gourmia 12” Crepe Maker – Nonstick Electric Griddle for Pancakes, Omelets & More, Precise Temp Control with Indicator Lights, Includes Spatula & Batter Spreader, Quick Cleanup, Stainless Steel Trim |
|
| 10 | Moss & Stone Electric Crepe Maker – 8” Portable Crepe Pan Nonstick with Dipping Plate, Auto Shut-Off, On/Off Switch, Even Heating & One Automatic Temperature Control – Compact Crepe Maker |
|
Your Batter Needs Adjusting
The batter itself plays a crucial role in non-stick success.
- Wrong Consistency: If your batter is too thick, it won’t spread thinly and evenly, leading to dense, unevenly cooked crepes that are more prone to sticking. Conversely, if it’s too watery, it can cook too fast or tear easily.
- Insufficient Fat in Batter: Many recipes call for melted butter or oil directly in the batter. This internal fat content contributes to the crepe’s flexibility and its ability to release from the pan. If your recipe is lean on fat, your crepes might be more inclined to stick.
- Too Much Sugar: While sugar adds flavor and aids in browning, excessive amounts can cause the crepe to caramelize and stick more readily to the hot surface, especially if the temperature is also too high.
You’re Rushing the Process
Patience is a virtue in crepe making. Trying to rush can lead to sticky situations.
- Flipping Too Early: If you attempt to flip a crepe before it has fully set and the edges have begun to lift and brown, it will almost certainly tear and stick. The crepe needs time to cook through sufficiently on the first side to develop structural integrity.
- Overcrowding the Pan: Pouring too much batter can lead to an overly thick crepe that cooks unevenly, making it difficult to flip and increasing the chances of it sticking. Crepes are meant to be thin.
Technique Troubles
Even with a perfect pan and batter, your technique can make or break a crepe.
- Aggressive Spreading: When using a T-shaped spreader, applying too much pressure can force the delicate batter into the pores of the cooking surface, making it stick.
- Poor Spatula Choice: A thick or unsuitable spatula can scrape the cooking surface, damaging seasoning or non-stick coatings, and also make it harder to get under the crepe without tearing it.
Detailed Solutions to Prevent Sticking
Now that we understand why crepes stick, let’s explore the practical steps you can take to prevent it. These methods are born from years of hands-on experience and countless perfect crepes.
Mastering Your Crepe Maker’s Surface
The foundation of a non-stick crepe is a well-prepared cooking surface.
Proper Seasoning Techniques
For cast iron or uncoated plates, seasoning is paramount.
- Initial Seasoning: Follow your manufacturer’s instructions diligently. This usually involves applying a thin layer of high-smoke-point oil (like sunflower oil) and heating the plate gradually to allow the oil to polymerize, creating a natural non-stick coating. You might need to repeat this process several times. For example, some professional guidance suggests applying a tablespoon of oil, spreading it evenly, heating to 480°F (250°C) for 5-10 minutes until dry, and repeating this three times with a full tablespoon, then four more times with half a tablespoon.
- Ongoing Maintenance: Re-season your plate periodically, especially if you notice food beginning to stick. After each use, clean the plate gently and apply a very thin layer of oil before storing. Avoid harsh soaps or abrasive scrubbers that can strip away seasoning. If you see small black spots, it might be burnt seasoning or carbonization that needs to be gently cleaned off before re-seasoning.
Optimal Temperature Control
Achieving the right heat is more art than science, but these tips will guide you.
- Preheat Thoroughly: Always allow your crepe maker to preheat fully to the recommended cooking temperature (often 200–220°C or 400°F). Even heat distribution is crucial. If using a stovetop, preheat the pan for a longer time, sometimes even slightly off-center initially to ensure the middle gets hot, then re-center.
- Test the Temperature: Before pouring your first full crepe, conduct a quick test. Drop a quarter-sized dot of batter onto the plate. If it cooks almost instantly, the plate is too hot. If it just sits there, it’s too cold. Aim for it to cook through in about 30 seconds.
- Adjust as You Go: Crepe makers, especially stovetop pans, can build up heat. Be prepared to slightly lower the temperature after the first few crepes to maintain consistency.
The Right Amount of Grease
Greasing is about providing a slick barrier, not a swimming pool for your batter.
- Light Coating: Apply a very thin layer of oil or clarified butter to the cooking surface between each crepe. Use a silicone brush, a paper towel, or a greasing pad to wipe it on and then wipe off any excess. Too much oil can cause the batter to slide unevenly and prevent proper browning.
- Consider Clarified Butter: Clarified butter (ghee) is often preferred as it has a higher smoke point than regular butter and won’t burn as easily, providing a cleaner, more consistent non-stick surface.
Perfecting Your Crepe Batter
The quality of your batter directly impacts its performance on the crepe maker.
Achieving the Ideal Consistency
The perfect crepe batter should be smooth, pourable, and slightly runny, similar to heavy cream, but not watery.
- Whisk Thoroughly: Ensure there are no lumps by whisking the batter well. For the smoothest results, you can strain the batter through a fine sieve.
- Adjust Liquid Content: Different flours absorb liquid differently. If your batter seems too thick, add a tiny bit more milk or water until it reaches the desired flow. If it’s too thin, a touch more flour can help, but be careful not to overmix.
Balancing Fat and Sugar
These ingredients contribute to both flavor and function.
- Adequate Fat: Ensure your recipe includes enough melted butter or oil (typically 2-3 tablespoons for a standard batch). This fat helps create a tender crepe and contributes to its non-stick properties.
- Mind the Sugar: If your crepes are consistently sticking and browning too quickly, especially on the first side, consider slightly reducing the sugar in your recipe, particularly for savory crepes.
Resting Your Batter
This crucial step is often overlooked.
- Allow to Rest: Let your crepe batter rest for at least 20-30 minutes, or even up to an hour, at room temperature. Resting allows the flour to fully hydrate, gluten to relax, and any air bubbles to dissipate. This results in a smoother, more pliable batter that spreads more easily and is less prone to tearing or sticking.
Refining Your Cooking Technique
Even with a perfectly prepared surface and batter, your hands-on approach matters.
Patience is Key: When to Flip
Don’t rush the flip! This is where many aspiring crepe makers falter.
- Visual Cues: Wait until the edges of the crepe appear golden brown and begin to lift slightly from the plate. The surface of the crepe should look set and dry, with no visible wet batter. This usually takes 1-2 minutes for the first side.
- Gentle Test: If unsure, gently lift an edge with your spatula to check for browning and release. If it resists, give it more time.
Spreading the Batter Flawlessly
For optimal thinness and even cooking, proper spreading is vital.
- Quick and Light: Pour a small amount of batter into the center of the preheated and lightly greased plate. Immediately use a T-shaped crepe spreader (rozel) to quickly and lightly spread the batter in a circular motion from the center outwards. The key is a light touch; avoid pressing down too hard.
- No Leftover Batter on Spreader: Always clean your spreader between uses. Leftover batter can harden and cause tears or uneven spreading on subsequent crepes.
Choosing the Best Spatula
The right tool makes all the difference.
- Wide and Flat: Invest in a wide, thin, and flat spatula, preferably made of silicone or wood, that can easily slide under the entire crepe without damaging the surface or tearing the delicate crepe. Avoid metal spatulas on non-stick surfaces.
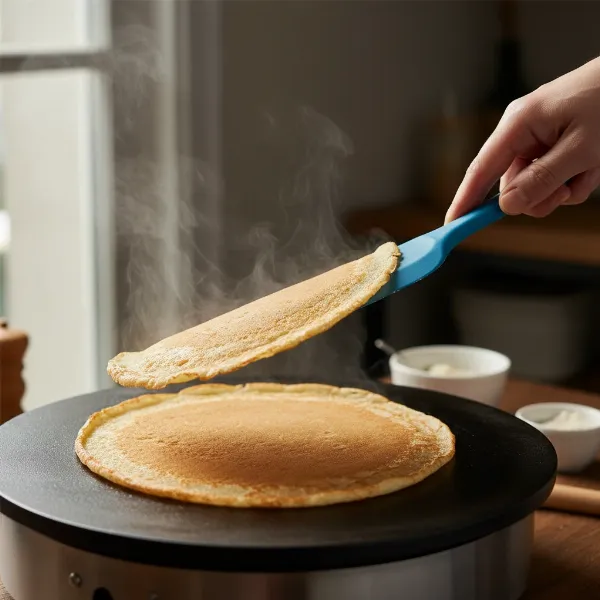 A perfectly golden crepe being flipped effortlessly with a thin spatula, indicating non-stick success.
Maintenance for Long-Term Non-Stick Performance
Consistent care ensures consistent results.
- Clean After Each Use: After your crepe-making session, clean the plate while it’s still warm but not hot. Use a damp cloth or a crepe spatula to remove any residue. For cast iron, avoid soap; simply wipe clean and re-oil lightly. For non-stick, use mild soap and water.
- Inspect Seasoning: Periodically check your cast iron or uncoated plate’s seasoning. If it looks dull or patchy, or if crepes start sticking more often, it’s time for a re-seasoning.
Expert Tips for Flawless Crepes
Beyond the technical aspects, a few seasoned insights can make your crepe-making journey smoother.
The “Sacrificial Crepe”
Don’t fret over the first crepe!
“Almost every chef I know, including myself, expects the first crepe to be a ‘sacrificial’ one. It’s not a failure; it’s your test run to ensure the temperature, seasoning, and batter are all perfectly dialed in.” – Admin, CrepeMakerDepot.com
The first crepe often absorbs excess oil or indicates if your heat isn’t quite right. Eat it yourself, adjust as needed, and enjoy the perfect crepes that follow.
Listen to Your Crepe Maker
Pay attention to how your machine responds.
- Does the batter sizzle too aggressively? Is there smoke from burning oil? Does it cook unevenly? These are all signals your crepe maker is sending you about its temperature or the condition of its surface. Learn to interpret these cues to make real-time adjustments.
Practice Makes Perfect
Crepe making is a skill that improves with repetition. Don’t be discouraged by initial setbacks. Each crepe you make, whether perfect or not, teaches you something new about your machine, your batter, and your technique.
Conclusion
Say goodbye to the frustration of sticky crepes! By understanding the nuances of proper plate seasoning, precise temperature control, optimal batter consistency, and refined cooking techniques, you can transform your crepe-making experience. From the simplest homemade breakfast to a professional kitchen, ensuring your crepes release cleanly is fundamental to their delicate texture and delicious appeal. Embrace these troubleshooting tips, and you’ll soon be flipping perfectly non-stick crepes with confidence and ease. What’s your favorite topping for a perfectly non-stick crepe?
Frequently Asked Questions
What is the ideal temperature for a crepe maker to prevent sticking?
The ideal temperature for a crepe maker typically ranges from 200°C to 220°C (400°F to 425°F). This temperature ensures the batter cooks quickly and evenly without burning, allowing the crepe to set and release cleanly from the surface. Always preheat your machine thoroughly before you begin cooking.
How often should I season my cast iron crepe maker?
For a new cast iron crepe maker, you should season it several times before its first use according to the manufacturer’s instructions. For ongoing maintenance, re-seasoning is recommended periodically, especially if you notice crepes starting to stick or if the non-stick layer appears worn. Regular light oiling after cleaning also helps maintain the seasoning.
Can too much oil cause crepes to stick?
Yes, paradoxically, too much oil can cause crepes to stick. An excessive layer of oil can prevent the batter from making direct contact with the hot surface, leading to uneven cooking and a sticky residue that impedes release. Always apply a thin, even layer of oil or clarified butter and wipe off any excess between crepes.
How thick should crepe batter be to avoid sticking?
Crepe batter should be thin enough to spread easily and evenly across the cooking surface, but not so watery that it tears when flipped. It should have the consistency of heavy cream or thin pancake batter. If your batter is too thick, add a little more liquid until you achieve the desired flow.
Why do my crepes stick even if I use a non-stick pan?
Even with a non-stick pan, crepes can stick if the pan is not properly preheated, if there’s insufficient fat (butter or oil) on the surface, or if the non-stick coating is damaged or worn. Overheating a non-stick pan can also degrade its coating over time, reducing its effectiveness and leading to sticking.