Your trusty crepe maker has been a breakfast hero, a brunch star, and a dessert dynamo. But even the most beloved kitchen companions eventually reach the end of their culinary journey. When your crepe maker finally breaks down, the dilemma of disposal arises. Tossing it in the regular trash feels wrong, and for good reason—it’s not just about space in a landfill; it’s about responsible waste management. Understanding how to properly recycle your old, broken crepe maker is crucial for protecting our environment and conserving valuable resources. This guide will walk you through the best and most sustainable ways to give your old appliance a new life, long after its last golden crepe.
Why Proper Crepe Maker Recycling Matters
Throwing electronics and small appliances into the general waste stream has significant environmental consequences. Crepe makers, like many household gadgets, contain a mix of metals, plastics, and electronic components. When these end up in landfills, they can leach harmful substances into the soil and water, polluting ecosystems. Recycling, on the other hand, allows these valuable materials to be recovered and reused, reducing the need for virgin resources.
Steel, a primary component in many small appliances, is one of the most recycled materials globally. By recycling your crepe maker, you contribute to a circular economy, minimizing waste accumulation and decreasing the environmental impact associated with extracting and processing new raw materials. It’s a small step that collectively makes a big difference in reducing pollution and conserving energy.
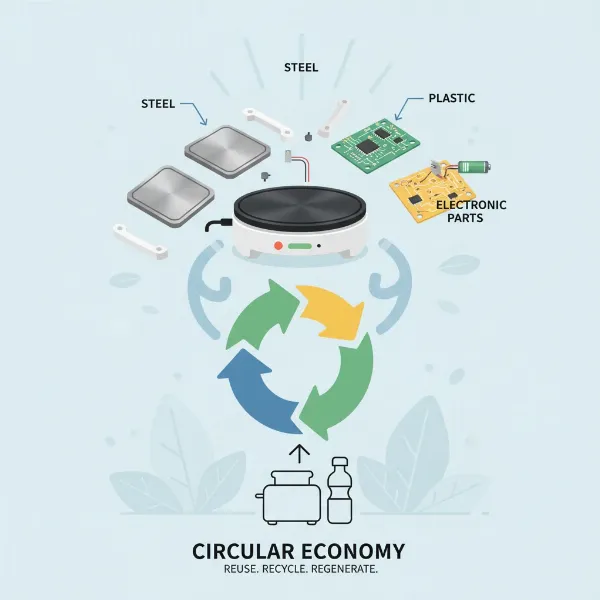 Recycled crepe maker components illustrating circular economy and material recovery
Where NOT to Dispose of a Crepe Maker: Common Misconceptions
Before exploring the right solutions, it’s essential to clarify where your broken crepe maker shouldn’t go.
The Curbside Recycling Bin
|
Our Picks for the Best Crepe maker in 2026
As an Amazon Associate I earn from qualifying purchases.
|
||
| Num | Product | Action |
|---|---|---|
| 1 | Moss & Stone Electric Crepe Maker 8 Inch, Portable Crepe Maker & Hot Plate Cooktop On/Off Switch, Nonstick Coating, Automatic Temperature Control, Easy To Use For Pancakes, Blintz, Chapati |

|
| 2 | Moss & Stone 12” Electric Griddle Pan & Crepe Machine, Non-Stick Electric Crepe Maker with Adjustable Temperature, Includes Spreader & Spatula – Ideal for Pancakes, Blintzes & Tortillas |
|
| 3 | Electric Crepe Maker 12'' & Griddle - Non-Stick Pan With Spreader for Roti, Tortilla, Blintzes, Pancakes - Adjustable Temperature, 1000W |
|
| 4 | Gourmia 12” Crepe Maker – Nonstick Electric Griddle for Pancakes, Omelets & More, Precise Temp Control with Indicator Lights, Includes Spatula & Batter Spreader, Quick Cleanup, Stainless Steel Trim |
|
| 5 | Moss & Stone Electric Crepe Maker – 8” Portable Crepe Pan Nonstick with Dipping Plate, Auto Shut-Off, On/Off Switch, Even Heating & One Automatic Temperature Control – Compact Crepe Maker |
|
| 6 | Nutrichef Electric Crepe Maker & Griddle Cooktop - Nonstick 12 Inch Aluminum Hot Plate with LED Indicator Lights & Adjustable Temperature Control - Wooden Spatula & Batter Spreader Included |
|
| 7 | Gourmia 8” Electric Crepe Maker – Nonstick Ceramic Surface, One-Touch Operation, Includes Batter Tray, Compact & Easy to Clean, Crepe, Pancake & Tortilla Maker |
|
| 8 | 16 Inch Commercial Crepe Maker, Dual-Head, Dual Zone Temp Setting, Nonstick Pancake Griddle Machine, 50-300°C(120-570℉), 3400W, S.S. Shell, for Catering, Restaurant, Snack Stand, CE Certified |
|
| 9 | Nutrichef Electric Crepe Maker - 8-inch Nonstick Cooktop with On/Off Switch - Cooks Roti, Tortillas & Pancakes - Automatic Temperature Control & Cool Touch Handle - Includes Food Bowl, Whisk & Spatula |
|
| 10 | Baker's Friend Instant Crepe Maker with Handle, Electric Crepe Maker Machine, Crepera Electrica, 8 Inch Non-stick Cooking Surface, Aqua |
|
Many people mistakenly assume that if an item is made of metal or plastic, it belongs in their household recycling bin. However, small appliances like crepe makers are considered “e-waste” or “special waste” by most municipal recycling programs. Placing them in your curbside bin can cause problems. When these items are processed with general recyclables, they can contaminate other materials or damage sorting machinery due to their varied components like circuit boards and different types of plastics and metals. The crushing action of collection trucks can also break down these items, scattering non-recyclable parts and rendering entire loads unrecyclable.
The Regular Trash Can
While better than contaminating a recycling stream, sending electronics to a landfill means valuable materials are lost forever, and potential toxins are introduced into the environment. It also contributes to the ever-growing problem of landfill waste. Opting for specialized disposal methods ensures that your old crepe maker is handled in an environmentally sound manner, preventing harm and promoting resource recovery.
Where to Recycle Your Broken Crepe Maker: Practical Solutions
Once you understand why conventional disposal methods are unsuitable, you can explore the correct avenues for recycling your broken crepe maker.
Specialized E-waste Recycling Centers
This is often the best and most comprehensive solution for broken electronics. E-waste recycling centers are equipped to dismantle appliances and separate components into their raw materials (metals, plastics, glass, circuit boards) for proper processing. These facilities ensure that any potentially hazardous materials are handled safely and that valuable resources are recovered effectively. A quick online search for “e-waste recycling near me” or “small appliance recycling” should direct you to local options.
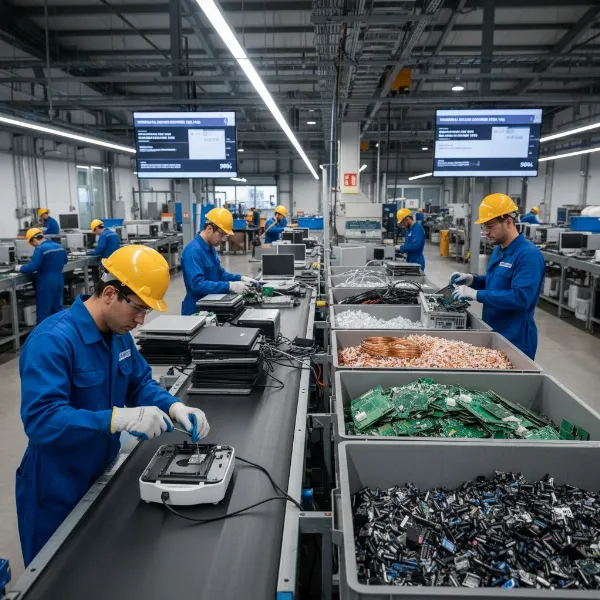 E-waste recycling center workers sorting electronic components for resource recovery
Retailer Take-Back Programs
Many electronics and appliance retailers have programs to collect old devices for recycling, especially when you’re purchasing a new one. This service often includes haul-away options for larger appliances, but some also accept smaller electronics. Check with local electronics stores, department stores, or even online retailers to see if they offer recycling services for small kitchen appliances. These programs aim to simplify the recycling process for consumers and ensure proper disposal.
Local Bulky Waste or Electronics Collection Events
Many communities organize special collection events for bulky waste, hazardous household waste, or electronics (e-waste) a few times a year. These events provide a convenient opportunity to dispose of items that aren’t accepted in regular curbside programs. Contact your local waste management department or check your city’s website for information on upcoming collection dates and accepted items. These programs are designed to handle a wide range of materials and ensure they are processed responsibly.
Scrap Metal Yards
If your crepe maker is predominantly metal, a scrap metal yard might be an option. These facilities pay for metal by weight, so while a single small appliance might not fetch much, it’s a way to ensure the metal components are recycled. Keep in mind that scrap yards typically deal with bulkier metal items, and the process of dismantling a crepe maker to separate metal from plastic and electronic parts might be required. It’s always best to call ahead and confirm their acceptance policies for small mixed-material appliances.
Preparing Your Crepe Maker for Recycling
Proper preparation can make the recycling process smoother and more efficient.
First, ensure the crepe maker is completely unplugged and has cooled down before handling. This is a basic safety measure. Next, secure the power cord by tying it up or taping it to the unit to prevent tripping or tangling during transport. If your crepe maker has any easily removable parts that are clearly not metal (like a glass lid or certain plastic handles) and you know your recycling center doesn’t accept them, you might consider removing them. However, for most integrated components, it’s best to leave the dismantling to the professionals at the recycling center.
Finding a Recycling Location Near You
Locating a suitable recycling facility is often the biggest hurdle. Start by visiting your local government’s waste management website; they usually have comprehensive guides or a search tool for specific items. National recycling locator websites, like Earth911, offer searchable databases where you can enter your zip code and the item you wish to recycle to find nearby facilities. Don’t hesitate to call your local solid waste hauler directly, as they can provide specific guidance for your area, including information on bulky waste pickups or special e-waste drop-off points.
Beyond Recycling: Repair and Reuse
While this guide focuses on recycling a broken crepe maker, it’s always worth considering repair or reuse if applicable. If your crepe maker has a minor, fixable issue, a local appliance repair shop might be able to extend its life. For a functional but unwanted crepe maker, consider donating it to a local thrift store or charity. Even for a truly broken unit, some DIY enthusiasts might salvage parts for other projects, though this is less common for kitchen appliances. Prioritizing repair and reuse before recycling minimizes waste even further.
Conclusion
When your crepe-making days with an old appliance come to an end, remember that its journey doesn’t have to conclude in a landfill. By understanding the proper channels for e-waste disposal—whether it’s a specialized recycling center, a retailer take-back program, or a community collection event—you play an active role in environmental stewardship. Taking the time to responsibly recycle your old broken crepe maker not only protects our planet but also conserves valuable resources for future use. So, next time a kitchen appliance gives out, ask yourself: how can I ensure this item gets a second life through sustainable recycling?
Frequently Asked Questions
Can I put my broken crepe maker in my regular recycling bin?
No, generally, you should not place your broken crepe maker in your regular curbside recycling bin. Small appliances are considered e-waste and require specialized processing to separate their various components safely and effectively, preventing contamination of other recyclables.
What kind of materials are typically found in a crepe maker?
Crepe makers are primarily composed of metals like steel, which makes up a significant portion of their weight. They also contain various plastics in handles and casings, as well as electronic components, wires (often copper), and sometimes non-stick coatings on the cooking surface.
Do electronics stores accept old small appliances like crepe makers for recycling?
Many electronics and appliance retailers offer take-back or recycling programs for old electrical items, especially when you are purchasing a new one. It’s advisable to check with your local stores or their websites to confirm their specific policies regarding small kitchen appliance recycling.