Are you dreaming of whipping up restaurant-quality crepes from the comfort of your kitchen? The right crepe maker can transform this delicate art into an enjoyable, fuss-free experience. Today, we delve into the Beper Electric Crepe Maker, a popular choice that promises to simplify your crepe-making journey. Whether you’re a seasoned chef or a complete beginner, this review will equip you with everything you need to know to decide if this compact appliance is the perfect addition to your culinary toolkit. We’ll explore its features, performance, and how it stacks up for daily use, helping you make an informed choice for your crepe cravings.
Exploring the World of Crepe Makers
Before we dive specifically into the Beper model, understanding the different types of crepe makers available can help contextualize its unique design and appeal.
Handheld (Dipping Style) Crepe Makers
Handheld crepe makers, often referred to as “dipping style” models, are designed for simplicity and portability. These are typically lightweight, cordless pans that heat up quickly on a base. To make a crepe, you dip the hot cooking surface directly into a shallow bowl of batter, then flip it over to cook.
- Advantages: Extremely user-friendly, excellent for beginners, takes up minimal counter space, often heats up very fast. They are typically budget-friendly and produce consistently thin crepes due to the dipping method.
- Disadvantages: Limited control over temperature (often just one setting), typically smaller crepe diameter, and might require a bit of practice to perfect the dipping motion for even coverage.
- Best For: Individuals or small families who are new to making crepes, those with limited kitchen space, or anyone looking for a quick and easy way to prepare breakfast or dessert. The Beper Electric Crepe Maker firmly falls into this category, emphasizing ease and speed.
|
Our Picks for the Best Crepe maker in 2026
As an Amazon Associate I earn from qualifying purchases.
|
||
| Num | Product | Action |
|---|---|---|
| 1 | Nutrichef Electric Crepe Maker & Griddle Cooktop - Nonstick 12 Inch Aluminum Hot Plate with LED Indicator Lights & Adjustable Temperature Control - Wooden Spatula & Batter Spreader Included |

|
| 2 | Gourmia 12” Crepe Maker – Nonstick Electric Griddle for Pancakes, Omelets & More, Precise Temp Control with Indicator Lights, Includes Spatula & Batter Spreader, Quick Cleanup, Stainless Steel Trim |
|
| 3 | Electric Crepe Maker 12'' & Griddle - Non-Stick Pan With Spreader for Roti, Tortilla, Blintzes, Pancakes - Adjustable Temperature, 1000W |
|
| 4 | Gourmia 8” Electric Crepe Maker – Nonstick Ceramic Surface, One-Touch Operation, Includes Batter Tray, Compact & Easy to Clean, Crepe, Pancake & Tortilla Maker |
|
| 5 | Nutrichef Electric Crepe Maker - 8-inch Nonstick Cooktop with On/Off Switch - Cooks Roti, Tortillas & Pancakes - Automatic Temperature Control & Cool Touch Handle - Includes Food Bowl, Whisk & Spatula |
|
| 6 | Moss & Stone Electric Crepe Maker 8 Inch, Portable Crepe Maker & Hot Plate Cooktop On/Off Switch, Nonstick Coating, Automatic Temperature Control, Easy To Use For Pancakes, Blintz, Chapati |
|
| 7 | Baker's Friend Instant Crepe Maker with Handle, Electric Crepe Maker Machine, Crepera Electrica, 8 Inch Non-stick Cooking Surface, Aqua |
|
| 8 | Moss & Stone 12” Electric Griddle Pan & Crepe Machine, Non-Stick Electric Crepe Maker with Adjustable Temperature, Includes Spreader & Spatula – Ideal for Pancakes, Blintzes & Tortillas |
|
| 9 | Moss & Stone Electric Crepe Maker – 8” Portable Crepe Pan Nonstick with Dipping Plate, Auto Shut-Off, On/Off Switch, Even Heating & One Automatic Temperature Control – Compact Crepe Maker |
|
| 10 | 16 Inch Commercial Crepe Maker, Dual-Head, Dual Zone Temp Setting, Nonstick Pancake Griddle Machine, 50-300°C(120-570℉), 3400W, S.S. Shell, for Catering, Restaurant, Snack Stand, CE Certified |
|
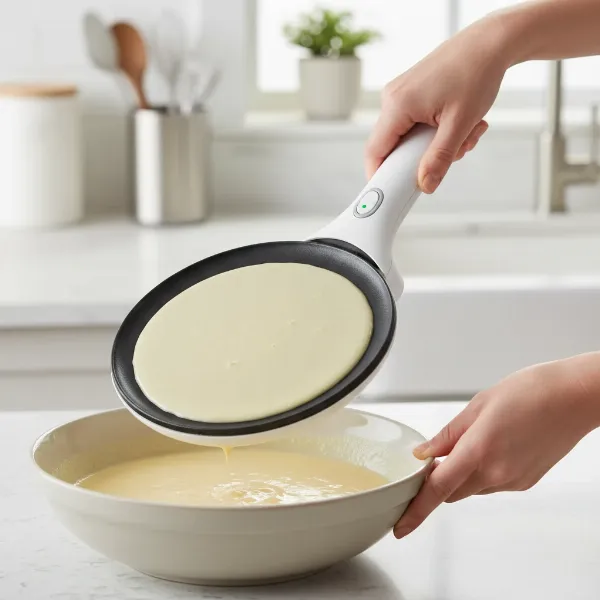 A person demonstrating a handheld dipping style electric crepe maker, showing the non-stick pan.
Tabletop Crepe Makers
Tabletop crepe makers resemble small electric griddles. They feature a flat, heated surface where you pour and spread the batter using a T-shaped spreader.
- Advantages: Offers more precise temperature control, often has a larger cooking surface for bigger crepes, and can be more versatile for other griddle tasks like pancakes or eggs. They typically provide a more traditional crepe-making experience.
- Disadvantages: Usually more expensive, takes up more counter space, and can have a steeper learning curve for spreading batter evenly.
- Best For: Regular crepe makers, those who enjoy experimenting with different crepe sizes and thicknesses, or anyone needing a multi-functional griddle.
Professional Crepe Makers
Professional-grade crepe makers are built for heavy-duty use in commercial settings like restaurants or cafes. They are robust, feature powerful heating elements, and offer very precise temperature controls over large cooking surfaces, often made of cast iron.
- Advantages: Unmatched durability, high output, superior heat retention and evenness, and built for continuous use.
- Disadvantages: Very expensive, large and heavy, and designed for commercial rather than home use.
- Best For: Commercial kitchens, food trucks, or serious home entertainers who demand industrial-level performance.
The Beper Electric Crepe Maker: An In-Depth Look
The Beper Electric Crepe Maker is a standout example within the handheld dipping style category, celebrated for its user-friendly design and efficiency. It aims to make the intimidating process of crepe making accessible to everyone.
Determining If It’s the Right Fit for Your Kitchen
Before purchasing any appliance, consider your culinary habits. Do you frequently crave crepes for breakfast, dessert, or a quick snack? Do you have limited counter space? Is ease of use and quick preparation a priority? If you answered yes to these, the Beper Electric Crepe Maker is designed with your needs in mind, especially for single servings or small batches without fuss.
Key Features and Performance of the Beper Electric Crepe Maker
The Beper Electric Crepe Maker comes packed with features tailored for effortless crepe preparation:
- Non-Stick Cooking Surface: A crucial element for any crepe maker, the Beper boasts a high-quality non-stick plate. This ensures your crepes release easily without tearing, minimizing the need for excessive oil and making cleanup a breeze. The cooking surface typically measures around 20cm (approximately 7.87 inches), ideal for individual crepes.
- Simplified Operation with Single Heat Setting: One of the Beper’s greatest strengths is its straightforward operation. With only one heat setting, there’s no need to fuss with temperature dials or guess the optimal heat. It heats up incredibly fast, letting you start cooking in moments. While this offers unparalleled simplicity, more experienced users might miss the variability of adjustable temperature. However, for most home users, this fixed setting consistently delivers perfectly cooked crepes.
- Fast Cooking Time: This appliance is designed for speed. Crepes cook quickly, often taking only 30 to 45 seconds per side. An indicator light signals when the surface is hot and ready, though keeping an eye on the batter and steam often provides the best gauge for doneness.
- Cordless Pan with a Stable Base: The Beper’s pan is cordless, receiving power from a compact base unit that plugs into a wall outlet. This design offers flexibility and ease of handling during the dipping process. The base is equipped with stable non-slip feet, ensuring the unit remains secure on your countertop during use.
- Easy to Clean: Thanks to its non-stick surface, cleaning the Beper Electric Crepe Maker is remarkably simple. A quick wipe down with a damp cloth after it cools is usually all that’s needed.
- Included Accessories: Typically, the Beper comes with a batter plate (or tray) for convenient dipping and a spatula, further enhancing the user experience right out of the box.
- Versatility Beyond Crepes: While perfect for crepes, the dipping style surface can also be utilized for other flat foods. You can try frying an egg or making small tortillas, expanding its utility in your kitchen.
User Experience: What to Expect
Using the Beper Electric Crepe Maker is intuitive. After plugging in the base, the cooking surface heats up rapidly. You then pour your crepe batter into the provided batter plate. Simply dip the hot cooking surface into the batter, ensuring it’s evenly coated. The non-stick surface helps the thin batter adhere perfectly. Flip it back onto the base to cook, and in under a minute, you’ll have a beautifully golden crepe ready to fill. The simple on/off button and indicator light contribute to a seamless cooking flow. It truly is a beginner-friendly device that helps build confidence in crepe making.
“For anyone who’s ever been intimidated by making crepes, a dipping-style maker like the Beper is a game-changer. It strips away the complexity and delivers delicious results with minimal effort.” – Sophia Chen, Culinary Appliance Expert
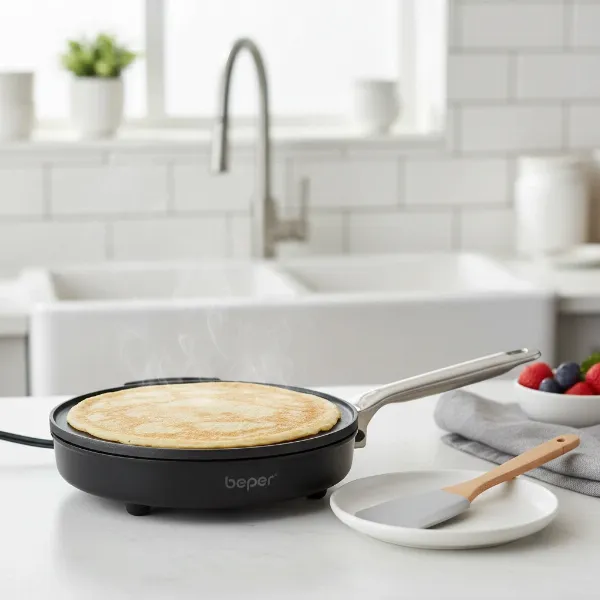 A Beper electric crepe maker in action on a kitchen counter, with a golden-brown crepe cooking.
Tips for Using and Maintaining Your Beper Crepe Maker
To get the most out of your Beper Electric Crepe Maker and ensure its longevity, here are some practical tips:
- Prepare Your Batter Properly: Ensure your crepe batter is smooth and lump-free. A slightly thinner batter works best with dipping-style makers for ultra-thin crepes.
- Preheat Thoroughly: Always allow the maker to fully preheat until the indicator light signals it’s ready. This ensures even cooking from the first crepe.
- Maintain Consistent Dipping: When dipping the hot surface into the batter, aim for a quick and even motion to coat the plate uniformly. Practice makes perfect!
- Watch for Doneness: While the indicator light is helpful, observing the crepe itself for golden edges and dissipated steam will give you the best indication of when it’s ready to flip or remove.
- Gentle Utensils: Always use non-abrasive utensils, such as the included spatula or silicone spatulas, to avoid scratching the non-stick coating.
- Prompt Cleaning: Clean the cooking surface after it has cooled down by wiping it with a damp cloth. For stubborn residue, use a mild dish soap and a soft sponge, then wipe dry. Never immerse the electrical base in water.
- Proper Storage: Store your Beper Crepe Maker in a dry place. Its compact size and cord storage feature make it easy to tuck away.
Conclusion
The Beper Electric Crepe Maker offers a compelling solution for anyone looking to enjoy homemade crepes without the hassle. Its dipping design, fast heating, and reliable non-stick surface make it incredibly easy to use, even for complete novices. While its single heat setting and smaller cooking surface cater more to simplicity over advanced versatility, it excels at its core function: producing consistently thin, delicious crepes in minutes. If ease of use, speed, and compact design are your top priorities, the Beper Electric Crepe Maker is a highly recommended appliance that will bring the joy of crepe making into your home with effortless grace. Ready to start your crepe-making adventure?
Frequently Asked Questions
Is the Beper Electric Crepe Maker suitable for beginners?
Absolutely! The Beper Electric Crepe Maker is exceptionally beginner-friendly due to its straightforward dipping mechanism, single heat setting, and fast cooking. It removes much of the guesswork associated with traditional crepe making, allowing new users to achieve perfect crepes quickly.
How do I clean my Beper Electric Crepe Maker?
Cleaning the Beper Electric Crepe Maker is very simple. After the appliance has cooled completely, wipe the non-stick cooking surface with a damp cloth. For any stuck-on batter, use a soft sponge with a small amount of mild dish soap, then wipe clean and dry. Do not submerge the electrical base in water.
What size crepes can I make with the Beper Electric Crepe Maker?
The Beper Electric Crepe Maker typically features a cooking surface of about 20cm (approximately 7.87 inches) in diameter. This size is ideal for making individual, perfectly portioned crepes, suitable for a variety of sweet or savory fillings.
Can the Beper Electric Crepe Maker be used for things other than crepes?
Yes, its non-stick heating surface can be surprisingly versatile. While primarily designed for crepes, you can also use the Beper Electric Crepe Maker to quickly fry small eggs, warm tortillas, or make mini pancakes, making it a handy multi-purpose tool for quick breakfasts.
Does the Beper Electric Crepe Maker have adjustable temperature settings?
Typically, the Beper Electric Crepe Maker is designed for maximum simplicity and features only one preset heat setting. It heats up quickly and maintains a consistent temperature optimized for crepe cooking, eliminating the need for manual adjustments.