Imagine this: a lazy weekend morning, the sun streaming in, the smell of freshly brewed coffee in the air. Friends and family are gathered around your kitchen island, not just waiting for breakfast, but creating it. At the center of it all is a hot, round surface where delicate, golden-brown crepes are being flipped with a flick of the wrist. This isn’t a Parisian cafe; it’s your home. If you’re ready to make that dream a reality and buy a crepe maker for your breakfast bar, you’ve come to the right place. As the head guru here at Crepe Maker Depot, I’ve seen how this simple appliance can transform a meal into an experience. Let’s dive in.
For those setting up a dynamic breakfast station, considering an appliance that delivers both quality and experience is key. One area that can significantly enhance this setup is understanding the various purchasing pathways available; to understand more about crepe maker financing options, exploring this content will provide valuable insights.
What Exactly is a Crepe Maker, and Why Does Your Breakfast Bar Need One?
A crepe maker is a dedicated cooking appliance, typically a flat, circular griddle, designed specifically for cooking thin, perfect crepes. Unlike a standard frying pan, its large, rimless surface makes spreading batter and flipping the delicate crepes a breeze.
But why do you need one for your breakfast bar? Simple: it’s about the interactive fun. A breakfast bar is a social hub, and a crepe maker turns it into a stage. It invites participation. Everyone gets to choose their fillings—Nutella, strawberries, bananas, or savory options like ham and cheese. It’s a conversation starter and a memory maker, far more engaging than a toaster.
The Lowdown: Types of Crepe Makers on the Market
When you start shopping, you’ll mainly see two contenders. Think of it like choosing between an automatic and a manual car—both get you there, but the experience is different.
| Feature | Electric Crepe Maker | Traditional Crepe Pan |
|---|---|---|
| Heat Source | Self-contained electric element | Stovetop (gas, electric, induction) |
| Heat Control | Precise, adjustable thermostat | Relies on stovetop controls |
| Ease of Use | Very beginner-friendly | Steeper learning curve |
| Portability | Can be used anywhere with an outlet | Limited to the kitchen stove |
| Best For | Breakfast bars, parties, consistent results | Traditionalists, small kitchens |
For a breakfast bar setup, I almost always recommend an electric model. The consistent, even heat is your secret weapon for foolproof crepes, especially when you’re entertaining and can’t be glued to the stove.
Key Features to Look For When You Buy a Crepe Maker for a Breakfast Bar
Not all crepe makers are created equal. Getting the right one means your breakfast bar becomes the talk of the town. Here’s what to zero in on.
### Size and Surface Area: How Many People Are You Feeding?
The cooking surface typically ranges from 10 to 16 inches.
- 10-12 inches: Perfect for smaller families or couples. It doesn’t take up much counter space and produces lovely, manageable crepes.
- 13-16 inches: This is the sweet spot for a true breakfast bar experience. The larger surface gives you that impressive, restaurant-style crepe and is more forgiving when you’re spreading the batter.
Think about your counter space and the typical size of your breakfast crowd. A larger surface also means you can make bigger, more generously filled crepes.
### Temperature Control is King
This is, without a doubt, the most critical feature. A good crepe maker will have an adjustable thermostat with a range of settings. Why? Because the perfect crepe requires precise heat management. Too low, and your crepe will be pale and tough. Too high, and it will burn before it cooks through.
“A reliable crepe maker’s most vital asset is its ability to hold a consistent temperature. It’s the difference between a beautifully laced, golden crepe and a culinary frustration.” – Pastry Chef Antoine Dubois
Look for a model with an indicator light that tells you when it has reached the desired temperature. This takes all the guesswork out of the process. For those who anticipate very high-volume use or are considering a small-scale professional setup, delving into the options available when you buy commercial crepe maker 2025 can provide a more robust and durable solution.
### Material Matters: Non-Stick vs. Cast Iron
The cooking surface material affects both cooking and cleanup.
- Non-stick (Teflon/Ceramic): This is the most common and user-friendly option. It requires little to no oil, the crepes release effortlessly, and cleanup is as simple as wiping it with a damp cloth. It’s the ideal choice for 99% of home users.
- Cast Iron: The traditionalist’s choice. It requires seasoning and a bit more care, but it provides unparalleled heat retention and can give your crepes a slightly crispier, more authentic texture. It’s for the enthusiast who enjoys the ritual of cooking.
### Don’t Forget the Accessories
Many crepe makers come in a kit with the essential tools of the trade. Look for a package that includes:
- A Batter Spreader (the T-stick): This is non-negotiable for achieving that paper-thin, even layer of batter.
- A Spatula: A long, thin spatula (wood or plastic) is designed to get under the delicate crepe without tearing it.
Having these included saves you the hassle of buying them separately and ensures they are the right size for your machine.
|
Our Picks for the Best Crepe Maker in 2025
As an Amazon Associate, we earn from qualifying purchases.
|
||
| Num | Product | Action |
|---|---|---|
| 1 | 24PCS Mini Pancake Maker Machine, Nonstick Electric Dutch Pancakes Griddle, Adjustable Heat Multi-Use Poffertjes Pan, Simple & Easy Baker for Home and Restaurants, Perfect for Breakfast & Desserts |

|
| 2 | ULTICOR Mini Pancake Maker – 14-Hole Electric Poffertjes Pan – Non-Stick Dutch Mini Pancakes Griddle – Easy to Use, Easy to Clean – Perfect for Breakfast, Desserts, Snacks & More |
|
| 3 | Gourmia 8” Crepe Maker – Nonstick Ceramic Electric Griddle for Crepes, Tortillas & Omelets, Automatic Batter Dipping, Compact & Lightweight, Quick Heat-Up, Includes Batter Plate, Easy Cleanup |
|
| 4 | 110V US Commercial 25PCS Mini Pancake Maker,950W Mini Dutch Pancake Maker,Non-stick,Dutch Poffertjes Grill,Stainless Steel,Breakfast,Snacks,Desserts. |
|
| 5 | Baker\'s Friend Instant Crepe Maker with Handle, Electric Crepe Maker Machine, Crepera Electrica, 8 Inch Non-stick Cooking Surface, Aqua |
|
| 6 | Gourmia 12” Crepe Maker – Nonstick Electric Griddle for Pancakes, Omelets & More, Precise Temp Control with Indicator Lights, Includes Spatula & Batter Spreader, Quick Cleanup, Stainless Steel Trim |
|
| 7 | Moss & Stone Electric Crepe Maker – 8” Portable Crepe Pan Nonstick with Dipping Plate, Auto Shut-Off, On/Off Switch, Even Heating & One Automatic Temperature Control – Compact Crepe Maker |
|
| 8 | Proctor Silex Electric Crepe Maker with 13” Nonstick Griddle for Eggs, Pancakes, Omelets and Quesadillas, with Temperature Control, Spatula, Spreader, Batter Cup, Stainless Steel (38400PS) |
|
| 9 | nutrichef Electric Crepe Maker Pan & Griddle, 12 Inch Nonstick Cooktop, LED Indicators & Adjustable Temperature Control, Includes Spatula, Batter Spreader, Cooks Crepes, Roti & Pancakes |
|
| 10 | Nutrichef Electric Crepe Maker & Griddle Cooktop - Nonstick 12 Inch Aluminum Hot Plate with LED Indicator Lights & Adjustable Temperature Control - Wooden Spatula & Batter Spreader Included |
|
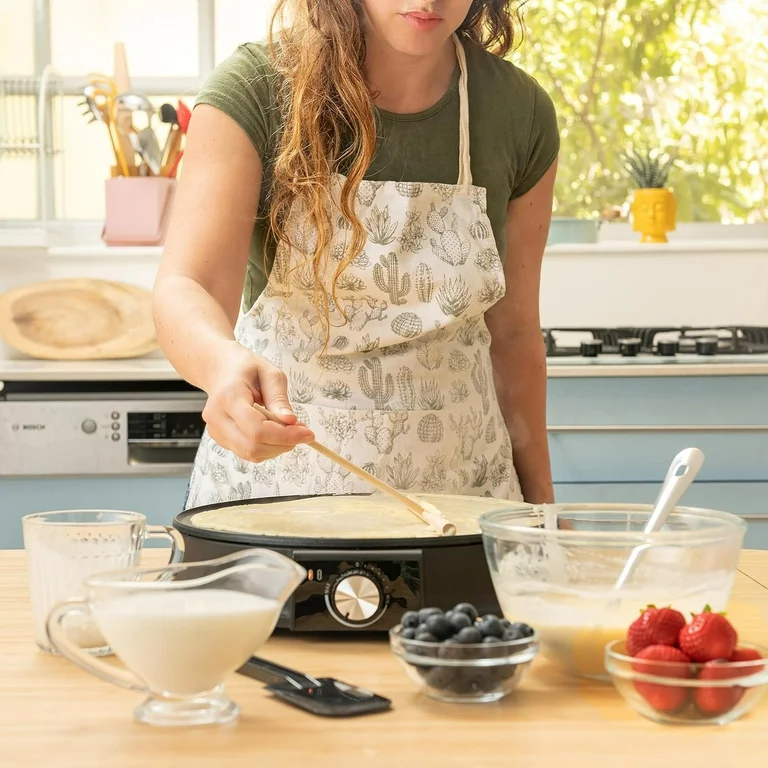
Your First Crepe: A Beginner’s Guide to Using Your New Toy
So you’ve made your choice, unboxed your shiny new machine, and are ready to go. Don’t be intimidated! It’s easier than it looks.
- The Zen of Preparation: Place your crepe maker on a flat, stable surface. Lightly grease the surface with a bit of butter or oil on a paper towel (even on non-stick for the very first crepe).
- Heat It Up: Turn on your crepe maker to a medium-high setting. Wait for the indicator light to signal it’s ready.
- The Pour: Ladle about 1/4 to 1/3 cup of batter onto the center of the surface. Don’t overdo it!
- The Spread: Immediately grab your T-shaped spreader. Starting from the center, spread the batter in a smooth, circular motion outwards. Work quickly but gently. The goal is a thin, even circle.
- The Cook: Let it cook for about 30-60 seconds. You’ll see the edges start to dry and lift slightly. The surface will go from shiny to matte.
- The Flip: Slide your long spatula completely under the crepe. In one confident motion, lift and flip it over. It should be a light golden brown.
- The Finish: The second side cooks much faster, usually just 20-30 seconds. Now’s the time to add your fillings to one half before folding.
Tips from the Trenches: My Secrets to Perfect Crepes Every Time
After making literally thousands of crepes, I’ve learned a few things.
- Let Your Batter Rest: This is the golden rule. After you mix your batter, let it rest in the fridge for at least 30 minutes, or even overnight. This allows the gluten to relax and the flour to fully hydrate, resulting in a more tender, flavorful crepe.
- The First Crepe is for the Chef: Don’t be discouraged if the first one is a disaster. It’s a sacrifice to the crepe gods! Use it to test the temperature and your technique.
- Keep the Spreader Clean: Dip the spreader in a glass of water and wipe it between each crepe to prevent batter from clumping and tearing your next masterpiece.
- Work with Confidence: Spreading and flipping requires a decisive, fluid motion. Hesitation is your enemy. Just go for it!
Keeping it Clean: How to Care for Your Crepe Maker
Want your crepe maker to last? Treat it right. The good news is, it’s incredibly easy.
- Cool It Down: Always let the machine cool down completely before cleaning.
- Wipe, Don’t Scrub: For a non-stick surface, a simple wipe with a damp, soft cloth or paper towel is usually all it takes.
- Tackle Stubborn Bits: If you have some cooked-on batter, use a plastic spatula to gently scrape it off. Never use metal utensils or abrasive scrubbers, as they’ll ruin the non-stick coating.
- Store It Smart: Store your crepe maker flat, and don’t place anything on top of the cooking surface to avoid scratches.
Beyond the Crepe: Other Amazing Breakfast Bar Treats
Your crepe maker is more versatile than you think! Don’t let it be a one-trick pony. Use that beautiful, even heating surface to make:
- Pancakes and Blintzes: Perfect for American-style pancakes or cheese-filled blintzes.
- Tortillas: Warm up store-bought tortillas or even cook fresh ones.
- Quesadillas: The large, flat surface is ideal for assembling and grilling a perfect quesadilla.
- Fried Eggs: You can cook flawless sunny-side-up eggs without any hot spots.
Final Thoughts: Your Breakfast Bar Awaits
Choosing to buy a crepe maker for your breakfast bar is about more than just buying another kitchen gadget. It’s an investment in fun, flavour, and shared experiences. It’s about turning a simple meal into an interactive event that brings everyone together. By focusing on the right size, precise temperature control, and user-friendly features, you’ll find the perfect machine to become the heart of your kitchen.
Now go on, get that batter resting. Your weekend mornings are about to get a whole lot more delicious. We’d love to hear about your creations—share your favorite crepe fillings in the comments below!
Frequently Asked Questions (FAQ)
1. What is the ideal temperature for making crepes?
The ideal temperature is typically medium-high, around 375-400°F (190-200°C). A good electric crepe maker with an adjustable thermostat allows you to find the perfect setting where the batter sizzles gently upon contact without burning too quickly.
2. Can I use pancake batter on a crepe maker?
Yes, you can, but the result will be a pancake, not a crepe. Crepe batter is much thinner, allowing it to spread into a delicate, lacey layer. Pancake batter is thicker and will create a fluffier, smaller disk on the large surface.
3. Are the included accessories like the spreader and spatula necessary?
Absolutely. While you can try to tilt and swirl a pan, the T-shaped spreader is essential for getting that signature paper-thin, even layer on a flat electric crepe maker. A regular spatula is often too thick and short, risking tears when you flip the crepe.
4. How do I season a cast iron crepe maker?
To season a cast iron surface, you apply a very thin layer of neutral oil (like canola or grapeseed oil) and heat it until it starts to smoke. Let it cool, wipe off any excess, and repeat the process a few times to build up a natural, non-stick patina.
5. Is a more expensive crepe maker worth the money?
Often, yes. Higher-priced models typically offer more robust construction, more precise and consistent temperature control, and a more durable non-stick surface. For anyone planning to use their crepe maker frequently for a breakfast bar, investing a bit more can lead to better results and a longer-lasting appliance.