Hello there, fellow food lover! Welcome to Crepe Maker Depot. I’m the heart and soul behind this little corner of the internet, and if there’s one thing that gets me going, it’s the sizzle of batter hitting a hot surface, transforming into a delicate, golden-brown crepe. If you’re here, you’re probably looking to buy a compact crepe maker under 100, and let me tell you, you’ve come to the right place. This isn’t just about buying an appliance; it’s about unlocking a world of culinary creativity, from Parisian street-style snacks to hearty breakfast wraps.
For years, I’ve seen people struggle with regular pans, ending up with crepes that are more like scrambled pancakes. It’s a common story! A dedicated crepe maker is a game-changer, and you don’t need to break the bank to get a fantastic one. This guide is your roadmap to finding that perfect, budget-friendly machine that will have you flipping like a pro in no time. Let’s dive in and find the kitchen companion you’ve been dreaming of.
What Is a Crepe Maker and Why Do You Need One?
At its core, a crepe maker is a specialized cooking appliance with a large, flat, circular cooking surface designed for one thing: making perfect crepes. Think of it as a griddle that’s been perfected for this specific, delicate task. You might be wondering, “Can’t I just use my trusty non-stick skillet?” You can try, but the results are rarely the same.
The magic of a dedicated crepe maker lies in its consistent, evenly distributed heat. A standard pan often has hot spots, leading to crepes that are burnt in the middle and raw on the edges. A crepe maker’s purpose-built surface ensures your batter cooks uniformly from edge to edge, giving you that signature paper-thin, tender texture every single time. It takes the guesswork out of the equation, which is fantastic for both beginners and seasoned cooks.
What Are the Main Types of Crepe Makers?
When you start your search, you’ll generally find two main styles vying for your attention. Each has its own personality and perks. Understanding the difference is the first step to choosing the right tool for your kitchen.
| Feature | Electric Crepe Maker | Crepe Pan (Stovetop) |
|---|---|---|
| Heat Source | Self-contained electric heating element | Gas or electric stovetop |
| Heat Control | Often has precise temperature dials | Relies on your stovetop’s controls |
| Consistency | Excellent. Set the temp and it stays there. | Can vary; requires more user attention. |
| Portability | Needs an outlet. Can be used anywhere with power. | Limited to the kitchen stovetop. |
| Best For | Beginners and those who want “set it and forget it” consistency. | Experienced cooks who are comfortable managing heat. |
While a traditional crepe pan can produce wonderful results, for someone looking to buy a compact crepe maker under 100, an electric model usually offers the best value and ease of use. It’s an all-in-one solution that simplifies the entire process.
Key Features to Consider When You Buy a Compact Crepe Maker Under 100
Alright, let’s get down to the nitty-gritty. Finding a great appliance on a budget is all about knowing which features truly matter. When you’re evaluating your options, keep these key points in mind.
### Size and Portability
Since you’re looking for a compact model, size is paramount. Most budget-friendly electric crepe makers have a cooking surface between 10 and 13 inches. A 12-inch surface is a fantastic sweet spot—large enough to make substantial crepes but small enough for easy storage in a standard kitchen cabinet. Also, look for models with a slim profile and built-in cord storage. This makes a world of difference when you’re trying to keep your countertops clutter-free.
### Temperature Control
Is adjustable temperature control necessary? Absolutely. The ability to fine-tune the heat is what separates a good crepe from a great one. Cheaper models might only have an on/off switch, but the best options under $100 will have a variable temperature dial. This allows you to find the perfect heat for a delicate, lacy crepe or turn it up for a heartier buckwheat galette.
“Precise temperature control is non-negotiable. The ideal crepe is cooked quickly on a surface that’s hot enough to set the batter instantly but not so hot that it burns before you can spread it. A variable dial gives you that control.” – Pastry Chef Isabelle Dubois
### Cooking Surface and Material
The vast majority of crepe makers in this price range feature a non-stick coating. This is a huge plus, as it allows you to use minimal oil or butter and ensures your delicate creations slide right off without tearing. Look for PFOA-free non-stick surfaces for peace of mind. The material underneath is typically aluminum, which is an excellent heat conductor and helps maintain that crucial even temperature across the entire plate.
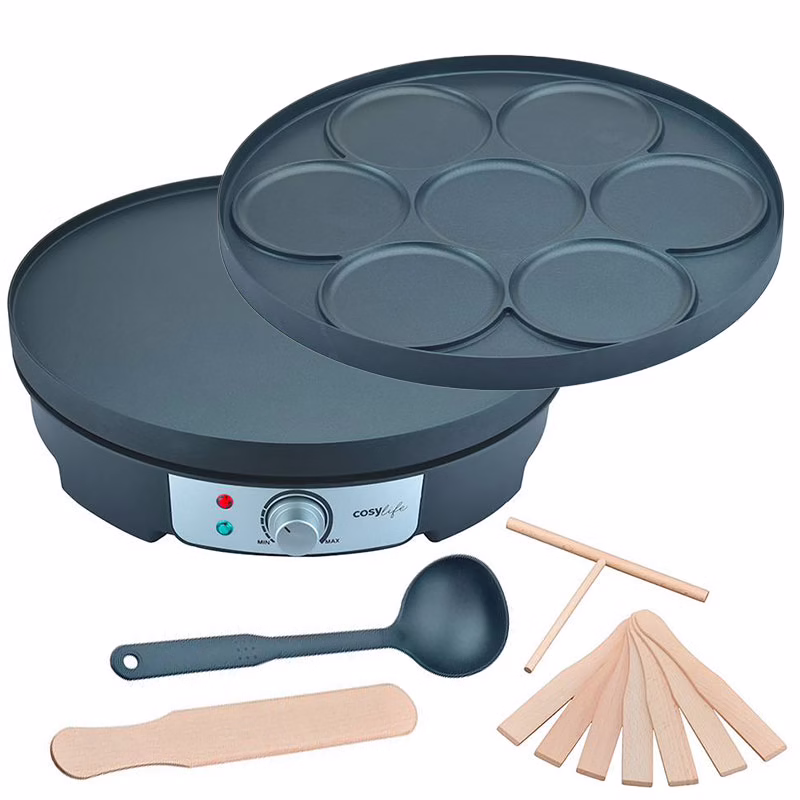
### Included Accessories
Many of the best deals when you buy a compact crepe maker under 100 come in a kit with essential tools. These aren’t just throw-ins; they are vital for the craft.
- Batter Spreader: This T-shaped wooden or plastic tool is used to spread the batter in a thin, even circle. It’s the secret to achieving that professional, paper-thin quality.
- Spatula: A long, thin spatula (often called a turner) is designed to get underneath the entire crepe, making it easy to lift, fold, and flip without tearing.
Getting these included saves you the hassle and extra cost of buying them separately.
|
Our Picks for the Best Crepe Maker in 2025
As an Amazon Associate, we earn from qualifying purchases.
|
||
| Num | Product | Action |
|---|---|---|
| 1 | 110V US Commercial 25PCS Mini Pancake Maker,950W Mini Dutch Pancake Maker,Non-stick,Dutch Poffertjes Grill,Stainless Steel,Breakfast,Snacks,Desserts. |

|
| 2 | ULTICOR Mini Pancake Maker – 14-Hole Electric Poffertjes Pan – Non-Stick Dutch Mini Pancakes Griddle – Easy to Use, Easy to Clean – Perfect for Breakfast, Desserts, Snacks & More |
|
| 3 | Baker\'s Friend Instant Crepe Maker with Handle, Electric Crepe Maker Machine, Crepera Electrica, 8 Inch Non-stick Cooking Surface, Aqua |
|
| 4 | Proctor Silex Electric Crepe Maker with 13” Nonstick Griddle for Eggs, Pancakes, Omelets and Quesadillas, with Temperature Control, Spatula, Spreader, Batter Cup, Stainless Steel (38400PS) |
|
| 5 | Gourmia 8” Crepe Maker – Nonstick Ceramic Electric Griddle for Crepes, Tortillas & Omelets, Automatic Batter Dipping, Compact & Lightweight, Quick Heat-Up, Includes Batter Plate, Easy Cleanup |
|
| 6 | Moss & Stone Electric Crepe Maker – 8” Portable Crepe Pan Nonstick with Dipping Plate, Auto Shut-Off, On/Off Switch, Even Heating & One Automatic Temperature Control – Compact Crepe Maker |
|
| 7 | 24PCS Mini Pancake Maker Machine, Nonstick Electric Dutch Pancakes Griddle, Adjustable Heat Multi-Use Poffertjes Pan, Simple & Easy Baker for Home and Restaurants, Perfect for Breakfast & Desserts |
|
| 8 | nutrichef Electric Crepe Maker Pan & Griddle, 12 Inch Nonstick Cooktop, LED Indicators & Adjustable Temperature Control, Includes Spatula, Batter Spreader, Cooks Crepes, Roti & Pancakes |
|
| 9 | Nutrichef Electric Crepe Maker & Griddle Cooktop - Nonstick 12 Inch Aluminum Hot Plate with LED Indicator Lights & Adjustable Temperature Control - Wooden Spatula & Batter Spreader Included |
|
| 10 | Gourmia 12” Crepe Maker – Nonstick Electric Griddle for Pancakes, Omelets & More, Precise Temp Control with Indicator Lights, Includes Spatula & Batter Spreader, Quick Cleanup, Stainless Steel Trim |
|
How Do I Use a Crepe Maker for the First Time?
Got your new machine? Awesome! Don’t be intimidated. Making your first crepe is a rite of passage, and I’m here to walk you through it.
- Preparation is Key: Give the cooking surface a quick wipe with a damp cloth. Place the crepe maker on a flat, stable surface. Plug it in and turn the temperature dial to a medium-high setting. Most models have an indicator light that turns off when it’s reached the desired temperature.
- A Touch of Grease: Even with a non-stick surface, it’s a good idea to lightly grease the plate for your first crepe. A small knob of butter or a light wipe with a paper towel dipped in vegetable oil works perfectly.
- The Pour: Ladle about 1/4 to 1/3 cup of your favorite crepe batter onto the center of the hot surface. The amount will depend on the size of your machine.
- The Spread: Now for the fun part! Immediately take your T-shaped spreader and, starting from the center, gently push the batter outwards in a smooth, circular motion. Work quickly but don’t panic. Your first few might look a bit… abstract. That’s part of the charm!
- The Cook: Let the crepe cook for about 30-60 seconds, or until the edges start to look dry and lift slightly from the surface. The top should no longer look wet.
- The Flip: Slide your long spatula completely under the crepe. In one confident motion, lift and flip it over. It should be a beautiful golden brown.
- The Finish: Cook the other side for another 20-30 seconds. It won’t need as long. Slide it off onto a plate, and you’re ready to fill and serve!
Pro Tips for Perfect Crepes Every Single Time
Over the years, I’ve picked up a few tricks that make all the difference. Consider these my gift to you.
- Rest Your Batter: After mixing your batter, let it rest in the fridge for at least 30 minutes, or even overnight. This allows the gluten to relax, resulting in a more tender, less rubbery crepe.
- Find Your Temperature Sweet Spot: Every machine is slightly different. Play around with the temperature dial to find what works best for your batter. You’re looking for a heat level that cooks the crepe through in under a minute per side.
- Keep the Spreader Clean and Wet: Some people like to keep a small bowl of water nearby to dip the spreader in between crepes. This prevents the batter from sticking to it, allowing for a smoother spread.
- Don’t Be Afraid to Fail: Seriously! Your first crepe is almost always a sacrifice to the crepe gods. It’s the “chef’s treat.” Use it to test your heat and technique, then dive into the rest of the batch with confidence.
How to Clean and Care for Your Crepe Maker
Keeping your crepe maker in top shape is incredibly simple and will ensure it lasts for years. The key is to be gentle.
Cleaning Checklist:
- [ ] Always unplug and let it cool completely. Never pour cold water on a hot surface, as this can warp the plate or damage the heating element.
- [ ] Wipe, don’t scrub. Use a soft, damp cloth or paper towel to wipe away any leftover crumbs or grease.
- [ ] Use a little soap for stubborn spots. If you have some stuck-on bits, a tiny drop of dish soap on your damp cloth should do the trick. Wipe it clean with a fresh damp cloth afterward.
- [ ] Never submerge the unit in water. It’s an electrical appliance!
- [ ] Store it properly. Once clean and dry, store it flat to protect the non-stick surface from getting scratched.
Beyond Crepes: What Else Can You Make?
One of the best things about a crepe maker is its versatility! Think of it as a perfectly flat electric griddle. You can use it to make:
- Pancakes and blinis
- Tortillas and flatbreads
- Quesadillas
- Grilled cheese sandwiches
- Scrambled or fried eggs
- Bacon or sausage patties
This multi-functionality makes your decision to buy a compact crepe maker under 100 an even smarter investment for your kitchen.
Frequently Asked Questions
### What is the ideal temperature for making crepes?
The perfect temperature is typically in the medium to medium-high range, around 375-400°F (190-200°C). Start in the middle of your machine’s dial and adjust up or down until you get a crepe that cooks to a light golden brown in about 45 seconds on the first side.
### Why are my crepes tearing when I try to flip them?
This usually happens for one of two reasons. Either the crepe isn’t cooked enough, and the batter is still too delicate, or your batter is too thin. Let it cook a few seconds longer until the edges are visibly dry. If it persists, try adding an extra tablespoon of flour to your batter.
### Do I need to season my crepe maker’s surface?
For most modern non-stick crepe makers, traditional seasoning isn’t required. However, wiping it with a very thin layer of oil before your first use can help condition the surface and ensure nothing sticks right out of the box.
### Can I use metal utensils on my crepe maker?
No, please don’t! Metal utensils will scratch and destroy the non-stick coating. Always use the wooden or heat-resistant plastic tools that came with your machine, or other silicone and wood utensils.
### How do I store leftover crepe batter?
Leftover batter can be stored in an airtight container in the refrigerator for up to two days. Give it a good whisk before using it again, as some separation may occur.
Final Thoughts on Your Crepe-Making Journey
Choosing to buy a compact crepe maker under 100 is one of the most rewarding and cost-effective upgrades you can make to your kitchen. It’s more than just an appliance; it’s a passport to a world of delicious possibilities, from lazy Sunday brunches to quick and elegant weeknight dinners. It brings people together and turns a simple meal into a memorable experience.
We’ve covered everything from what to look for in a machine to how to master that perfect flip. Now, the rest is up to you. I encourage you to embrace the process, have fun with it, and don’t be afraid to experiment with new fillings and flavors.
Happy crepe making! And when you create your first masterpiece, be sure to come back and share your story with our community here at Crepe Maker Depot. We can’t wait to see what you whip up.