Let’s be real for a moment. Are you tired of the same old rotation of cereal, toast, and maybe pancakes on a really ambitious Saturday? Imagine this instead: the gentle sizzle of thin batter hitting a hot surface, the delightful aroma filling your kitchen, and the excited faces of your family as they customize their own delicate, golden-brown crepes. This delicious scene is easier than you think to achieve with the right Crepe Maker For Family Breakfast. It’s not just an appliance; it’s a ticket to creating memorable meals and starting your day with a touch of fun and elegance.
If you’ve ever tried making crepes in a regular frying pan, you know the struggle can be real. The uneven heat, the tricky flipping, the less-than-perfectly-round shapes—it can turn a fun idea into a frustrating mess. That’s where a dedicated crepe maker swoops in to save the day, and your breakfast.
What’s the Big Deal with a Crepe Maker, Anyway?
You might be wondering, “Is a crepe maker really necessary?” In short: if you want consistently perfect crepes with minimal fuss, then absolutely. A dedicated crepe maker is designed for one primary mission: to distribute heat evenly across a large, flat surface. This consistent temperature is the secret to achieving that paper-thin, uniformly cooked crepe that’s strong enough to hold your favorite fillings but delicate enough to melt in your mouth. Think of it as the difference between free-handing a perfect circle and using a compass—one gives you a reliable, beautiful result every single time.
The Lowdown on Different Types of Crepe Makers
When you start your search, you’ll mainly see two contenders in the ring: electric models and traditional stovetop pans. Neither is “better” than the other, but one will likely be a better fit for your kitchen and your family’s needs.
| Feature | Electric Crepe Maker | Stovetop Crepe Pan |
|---|---|---|
| Heat Source | Self-contained, plugs into an outlet | Uses your gas or electric stove burner |
| Heat Control | Precise temperature dials or settings | Relies on your control of the stove’s burner |
| Consistency | Excellent; maintains a steady temperature | Can have hot spots depending on the stove |
| Portability | Can be used anywhere with an outlet | Limited to your kitchen stovetop |
| Ease of Use | Very beginner-friendly | Has a slight learning curve |
| Best For | Families, beginners, entertainers | Those with limited counter space, experienced cooks |
An electric crepe maker for family breakfast is often the go-to choice because it’s incredibly user-friendly. The built-in thermostat takes the guesswork out of heating, ensuring you’re at the perfect crepe-making temperature from the first crepe to the last.
Key Features to Look for in a Crepe Maker for Family Breakfast
Navigating the options can feel overwhelming, but if you focus on a few key features, you’ll find the perfect match for your home.
### Size Matters: How Big Should You Go?
The size of the cooking surface is a huge factor. Most crepe makers range from 10 to 16 inches in diameter.
- 12-13 inches: This is the sweet spot for most families. It’s large enough to make a substantial, foldable crepe but doesn’t take up an entire countertop. It’s versatile for both breakfast crepes and savory dinner versions.
- 15-16 inches: If you have a large family or love to entertain, a bigger model can be a great investment, allowing you to produce larger, restaurant-style crepes.
- 10 inches or smaller: These are great for smaller households or for making things like blinis or smaller pancakes, but might feel a bit small for a full family meal.
### Temperature Control: The Secret to Golden Perfection
Look for an electric model with an adjustable thermostat. Different batters and recipes can require slightly different temperatures. Having precise control allows you to dial in that perfect heat setting for a lightly golden, tender crepe, preventing the dreaded burnt-on-the-outside, raw-on-the-inside scenario. Some models even have an indicator light that tells you when the surface is perfectly preheated.
### Surface Level: To Stick or Not to Stick?
A non-stick surface is non-negotiable for a beginner-friendly experience. It ensures your delicate crepes release easily without tearing, making that all-important flip a breeze. Most modern crepe makers feature a durable PFOA-free non-stick coating. This not only simplifies cooking but also makes cleanup astonishingly easy—usually just a quick wipe with a damp cloth is all it takes.
### The Little Extras: What’s in the Box?
The best crepe maker packages come with the tools of the trade. A good kit should include:
- A Batter Spreader: This T-shaped wooden or plastic tool is essential for spreading the batter into a thin, even circle.
- A Spatula: A long, thin spatula (often wood or heat-resistant plastic) is designed to get under the entire crepe, making lifting and flipping much easier than with a standard kitchen turner.
|
Our Picks for the Best Crepe Maker in 2025
As an Amazon Associate, we earn from qualifying purchases.
|
||
| Num | Product | Action |
|---|---|---|
| 1 | nutrichef Electric Crepe Maker Pan & Griddle, 12 Inch Nonstick Cooktop, LED Indicators & Adjustable Temperature Control, Includes Spatula, Batter Spreader, Cooks Crepes, Roti & Pancakes |

|
| 2 | 24PCS Mini Pancake Maker Machine, Nonstick Electric Dutch Pancakes Griddle, Adjustable Heat Multi-Use Poffertjes Pan, Simple & Easy Baker for Home and Restaurants, Perfect for Breakfast & Desserts |
|
| 3 | Gourmia 12” Crepe Maker – Nonstick Electric Griddle for Pancakes, Omelets & More, Precise Temp Control with Indicator Lights, Includes Spatula & Batter Spreader, Quick Cleanup, Stainless Steel Trim |
|
| 4 | 110V US Commercial 25PCS Mini Pancake Maker,950W Mini Dutch Pancake Maker,Non-stick,Dutch Poffertjes Grill,Stainless Steel,Breakfast,Snacks,Desserts. |
|
| 5 | Gourmia 8” Crepe Maker – Nonstick Ceramic Electric Griddle for Crepes, Tortillas & Omelets, Automatic Batter Dipping, Compact & Lightweight, Quick Heat-Up, Includes Batter Plate, Easy Cleanup |
|
| 6 | Baker\'s Friend Instant Crepe Maker with Handle, Electric Crepe Maker Machine, Crepera Electrica, 8 Inch Non-stick Cooking Surface, Aqua |
|
| 7 | ULTICOR Mini Pancake Maker – 14-Hole Electric Poffertjes Pan – Non-Stick Dutch Mini Pancakes Griddle – Easy to Use, Easy to Clean – Perfect for Breakfast, Desserts, Snacks & More |
|
| 8 | Nutrichef Electric Crepe Maker & Griddle Cooktop - Nonstick 12 Inch Aluminum Hot Plate with LED Indicator Lights & Adjustable Temperature Control - Wooden Spatula & Batter Spreader Included |
|
| 9 | Proctor Silex Electric Crepe Maker with 13” Nonstick Griddle for Eggs, Pancakes, Omelets and Quesadillas, with Temperature Control, Spatula, Spreader, Batter Cup, Stainless Steel (38400PS) |
|
| 10 | Moss & Stone Electric Crepe Maker – 8” Portable Crepe Pan Nonstick with Dipping Plate, Auto Shut-Off, On/Off Switch, Even Heating & One Automatic Temperature Control – Compact Crepe Maker |
|
Your First Crepe: A No-Fear Guide to Getting Started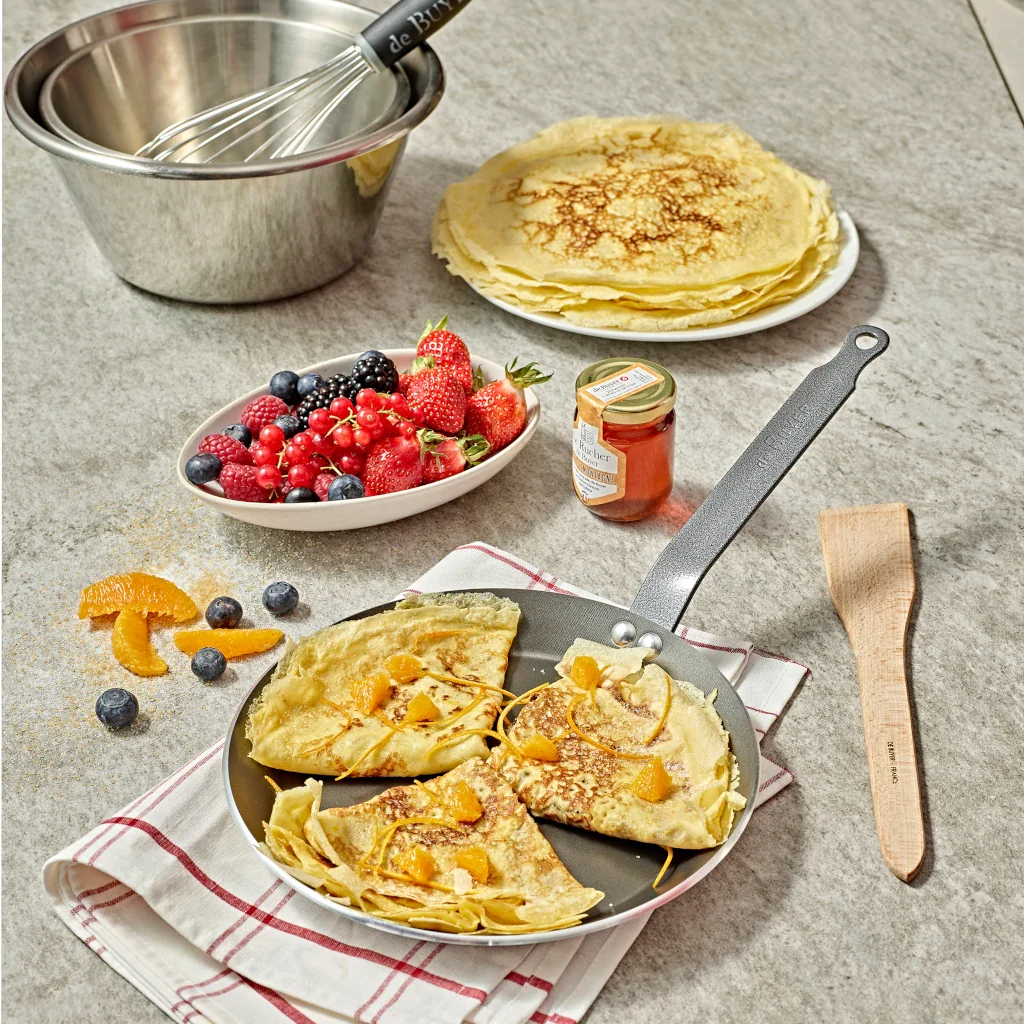
Ready to make some magic? Using your new crepe maker is simple once you get the hang of it.
- Prep Your Station: Get your batter, a small bowl of oil, and a paper towel ready. Plug in your crepe maker and set it to a medium-high temperature (around 400°F or 200°C is a good starting point). Let it preheat fully—the indicator light will tell you when it’s ready.
- Season the Surface: Lightly grease the hot surface with the oiled paper towel. You only need a very thin film of oil. You may only need to do this for the very first crepe of the batch.
- Pour and Spread: Pour a ladle of batter (about 1/3 to 1/2 cup, depending on the size of your machine) onto the center of the surface. Immediately grab your T-shaped spreader and, starting from the center, spread the batter outwards in a smooth, circular motion. Work quickly but gently!
- Cook and Flip: Let the crepe cook for about 30-60 seconds, or until the edges start to look dry and lift slightly from the surface. Slide your long spatula underneath the crepe and confidently flip it over.
- The Final Touch: Cook the second side for another 20-30 seconds. It won’t need as long. Once done, slide it onto a plate and get ready to add your family’s favorite fillings.
Pro Tips from the Crepe Maker Depot Kitchen
After making thousands of crepes, we’ve learned a few things. Here are some of our best tips for crepe success:
- Let Your Batter Rest: For the best results, let your crepe batter rest in the fridge for at least 30 minutes before using. This allows the gluten to relax, resulting in a more tender crepe.
- The First Crepe is a Test: Don’t be discouraged if your first crepe is a dud. It’s almost a tradition! Use it to test the temperature and the amount of batter.
- Keep ‘Em Warm: If you’re making a big batch, you can keep the finished crepes warm by stacking them on a plate with a piece of parchment paper between each one and covering them with a clean kitchen towel.
- Don’t Overmix: When making your batter, mix it just until the ingredients are combined. Overmixing can make your crepes tough.
“The single most important feature of a quality crepe maker is precise temperature control. It’s the key to achieving that perfectly thin, evenly browned crepe that chefs strive for. Too hot and it burns; too cool and it becomes rubbery. Find a machine that holds its temperature steady, and you’ve won half the battle.”
— Chef Isabelle Dubois, Pastry Consultant
Keeping It Clean: How to Care for Your Crepe Maker
Proper care will ensure your crepe maker for family breakfast lasts for years to come.
- Cool It Down: Always let the machine cool down completely before cleaning.
- Wipe, Don’t Scrub: For non-stick surfaces, simply wipe it clean with a soft, damp cloth or paper towel.
- Avoid Harsh Cleaners: Never use abrasive sponges, steel wool, or harsh chemical cleaners, as they can damage the non-stick coating.
- Store Properly: Store your crepe maker in a dry place. Keep the included tools with it so they don’t get lost in a drawer.
Beyond the Crepe: What Else Can You Make?
Your crepe maker is more versatile than you think! It’s essentially a large, flat electric griddle. Use it to make:
- Pancakes and flapjacks
- Tortillas
- Flatbreads like roti or naan
- Quesadillas
- Grilled cheese sandwiches
- Scrambled eggs or omelets
Frequently Asked Questions
What is the best temperature for making crepes?
A great starting point is between 375-400°F (190-200°C). This is hot enough to cook the crepe quickly without burning it. You can adjust slightly based on your specific batter recipe and desired color.
Can I use pancake batter on a crepe maker?
Yes, you can! A crepe maker works wonderfully as a griddle for pancakes. Since pancake batter is thicker, you won’t need to spread it; just pour it on and let it cook like you would in a pan.
Is a crepe maker better than a non-stick pan?
For making crepes, yes. A dedicated crepe maker offers a larger, perfectly flat surface and more consistent, even heating than a standard frying pan, which often has sloped sides and can heat unevenly on a burner.
How do I stop my crepes from sticking?
The key is a combination of a quality non-stick surface and a very light greasing before the first crepe. Also, ensure the crepe maker is fully preheated before pouring the batter.
Why are my crepes turning out rubbery?
Rubbery crepes are usually a result of overmixing the batter or cooking them at too low a temperature for too long. Mix your batter just until combined and ensure your crepe maker is hot enough to cook each side quickly.
Your New Weekend Tradition Awaits
Investing in a crepe maker for family breakfast is about more than just a new kitchen gadget. It’s about creating moments, starting new traditions, and turning an ordinary meal into an interactive, joyful experience. It’s about letting your kids choose between strawberries and chocolate sauce, or cheese and ham, and watching them build their own perfect breakfast. So go ahead, elevate your mornings and become the undisputed breakfast champion of your home.
We’d love to hear about your crepe-making adventures! Share your favorite family crepe recipes or your first experience with your new machine in the comments below.