The holidays are just around the corner, and you can almost smell it, can’t you? The scent of pine, the warmth of the fireplace, and the sweet aroma of something delicious baking in the kitchen. If you’re looking to elevate your holiday brunches and create unforgettable memories, now is the perfect time to explore the incredible Crepe Maker Holiday Sale Discounts. Forget wrestling with a finicky frying pan. We’re talking about crafting paper-thin, golden, and utterly perfect crepes with ease. This guide is your ticket to finding the perfect machine and mastering the art of the crepe, just in time for the festive season.
Why You Absolutely Need a Crepe Maker This Holiday Season
Let’s be honest. You’ve tried making crepes in a regular skillet. It’s a bit of a gamble, right? One side gets too brown, the shape is more “abstract art” than a perfect circle, and getting it thin enough feels like a magic trick. A dedicated crepe maker is a game-changer. It’s a specialized appliance designed for one glorious purpose: to give you a large, flat, and evenly heated surface, which is the secret to flawless crepes every single time. It takes the guesswork out of the process, transforming a potentially frustrating experience into a fun and creative culinary adventure for the whole family.
Imagine a lazy holiday morning, with everyone gathered in the kitchen, customizing their own crepes with fresh berries, whipped cream, or a decadent drizzle of chocolate. That’s the kind of magic a crepe maker brings to the table. It’s not just an appliance; it’s a centerpiece for connection and delicious fun.
What Are the Different Types of Crepe Makers?
When you start shopping, you’ll quickly notice there are a few different styles out there. The two main players in the home kitchen are electric crepe makers and traditional crepe pans.
A dedicated crepe maker typically refers to an electric countertop model with a built-in heating element. A crepe pan is a specialized, non-electric pan with low sides designed for use on a stovetop. Each has its own set of pros and cons, which can influence your decision when looking through the crepe maker holiday sale discounts.
| Feature | Electric Crepe Maker | Traditional Crepe Pan |
|---|---|---|
| Heat Source | Built-in electric element | Stovetop (gas, electric, induction) |
| Heat Control | Precise, often with a thermostat | Relies on stovetop control |
| Consistency | Excellent; even heat distribution | Can have hot spots; requires practice |
| Portability | Less portable; needs an outlet | Very portable; can be used anywhere |
| Ease of Use | Very beginner-friendly | Steeper learning curve |
| Price | Generally more expensive | More affordable |
For most people, especially those new to crepe making, an electric model is the way to go. The consistent temperature and easy-to-use surface make the learning process a breeze.
Choosing Wisely: Key Features to Look for During the Crepe Maker Holiday Sale Discounts
Navigating a sale can be overwhelming. To help you cut through the noise and find the perfect machine for your needs, here are the key features to focus on.
What Size Crepe Maker Do I Need?
The size of the cooking surface is probably the most important factor. Common sizes range from 10 to 16 inches. A 12 or 13-inch model is a fantastic sweet spot for home use. It’s large enough to make substantial, restaurant-style crepes but still manageable to store. If you have a large family or plan on hosting big brunch parties, a 16-inch model might be worth the counter space.
Why is Temperature Control So Important?
Consistent heat is the secret to a perfect crepe. Look for a model with an adjustable thermostat. This allows you to find the exact temperature your batter loves, giving you that beautiful, even golden-brown color without any burnt spots. Some models have simple low-medium-high settings, while more advanced ones offer precise degree control. The ability to fine-tune the heat is invaluable.
The Magic of a Non-Stick Surface
A high-quality non-stick surface is non-negotiable. It ensures your delicate crepes release effortlessly without tearing, and it makes cleanup an absolute dream. Most modern crepe makers feature excellent non-stick coatings, but it’s always a good idea to check reviews to see how they hold up over time. Remember, never use metal utensils on a non-stick surface!
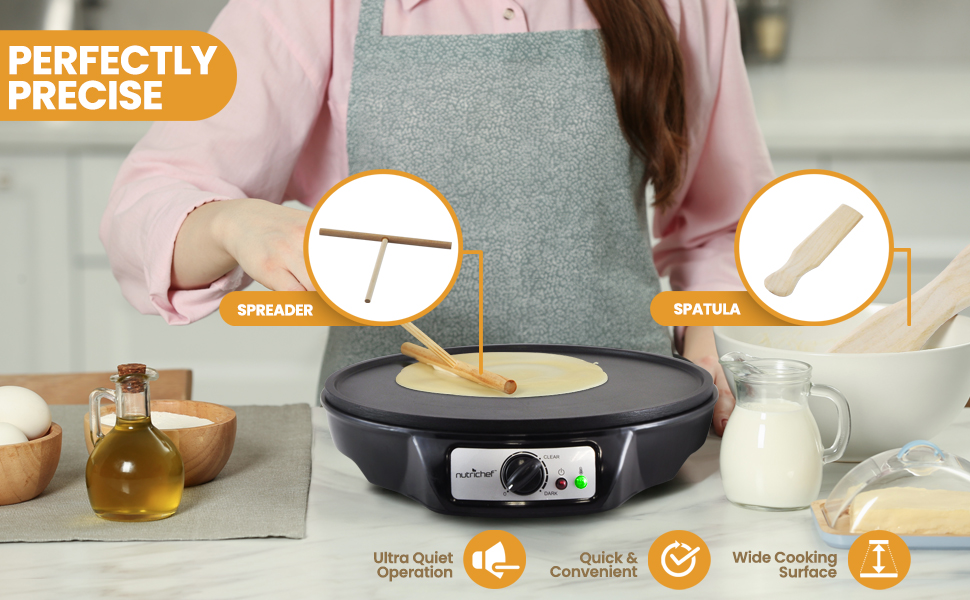
Don’t Forget the Accessories
Many crepe makers come in a kit with helpful tools. The two most important are:
- A Batter Spreader: This T-shaped wooden tool is used to spread the batter thinly and evenly across the surface in a circular motion.
- A Long Spatula: A long, thin spatula (often made of wood or heat-resistant nylon) is essential for lifting the edge and flipping the crepe without tearing it.
Getting these included is a great bonus, especially when you find great crepe maker holiday sale discounts.
|
Our Picks for the Best Crepe Maker in 2025
As an Amazon Associate, we earn from qualifying purchases.
|
||
| Num | Product | Action |
|---|---|---|
| 1 | nutrichef Electric Crepe Maker Pan & Griddle, 12 Inch Nonstick Cooktop, LED Indicators & Adjustable Temperature Control, Includes Spatula, Batter Spreader, Cooks Crepes, Roti & Pancakes |

|
| 2 | Gourmia 12” Crepe Maker – Nonstick Electric Griddle for Pancakes, Omelets & More, Precise Temp Control with Indicator Lights, Includes Spatula & Batter Spreader, Quick Cleanup, Stainless Steel Trim |
|
| 3 | ULTICOR Mini Pancake Maker – 14-Hole Electric Poffertjes Pan – Non-Stick Dutch Mini Pancakes Griddle – Easy to Use, Easy to Clean – Perfect for Breakfast, Desserts, Snacks & More |
|
| 4 | Nutrichef Electric Crepe Maker & Griddle Cooktop - Nonstick 12 Inch Aluminum Hot Plate with LED Indicator Lights & Adjustable Temperature Control - Wooden Spatula & Batter Spreader Included |
|
| 5 | Baker\'s Friend Instant Crepe Maker with Handle, Electric Crepe Maker Machine, Crepera Electrica, 8 Inch Non-stick Cooking Surface, Aqua |
|
| 6 | Proctor Silex Electric Crepe Maker with 13” Nonstick Griddle for Eggs, Pancakes, Omelets and Quesadillas, with Temperature Control, Spatula, Spreader, Batter Cup, Stainless Steel (38400PS) |
|
| 7 | 110V US Commercial 25PCS Mini Pancake Maker,950W Mini Dutch Pancake Maker,Non-stick,Dutch Poffertjes Grill,Stainless Steel,Breakfast,Snacks,Desserts. |
|
| 8 | Gourmia 8” Crepe Maker – Nonstick Ceramic Electric Griddle for Crepes, Tortillas & Omelets, Automatic Batter Dipping, Compact & Lightweight, Quick Heat-Up, Includes Batter Plate, Easy Cleanup |
|
| 9 | Moss & Stone Electric Crepe Maker – 8” Portable Crepe Pan Nonstick with Dipping Plate, Auto Shut-Off, On/Off Switch, Even Heating & One Automatic Temperature Control – Compact Crepe Maker |
|
| 10 | 24PCS Mini Pancake Maker Machine, Nonstick Electric Dutch Pancakes Griddle, Adjustable Heat Multi-Use Poffertjes Pan, Simple & Easy Baker for Home and Restaurants, Perfect for Breakfast & Desserts |
|
Your First Masterpiece: How to Use a Crepe Maker
You’ve unboxed your shiny new machine. Now what? Don’t be intimidated! It’s simpler than you think.
- Prepare Your Station: Set up your crepe maker on a flat, stable surface. Have your batter, a small bowl of oil, a paper towel, your spreader, and your spatula ready to go. You can find some amazing recipes in [our guide to the best crepe batters].
- Season the Surface (First Use Only): For the very first use, it’s a good idea to lightly season the surface. Heat the crepe maker, put a few drops of vegetable oil on it, and wipe it all over with a paper towel. This helps ensure nothing sticks.
- Heat It Up: Turn on your crepe maker to a medium-high setting. Most models have an indicator light that tells you when it has reached the desired temperature.
- Pour and Spread: Once hot, pour a ladleful of batter (about 1/3 to 1/2 cup, depending on the size of your machine) onto the center of the surface. Immediately grab your spreader, dip it into a glass of water to prevent sticking, and use it to spread the batter in a smooth, circular motion from the center outwards. Work quickly but gently.
- Cook and Flip: The crepe will cook very fast, usually in about 30-60 seconds. You’ll see the edges start to dry and lift slightly. Gently slide your spatula under the edge and, in one confident motion, flip the crepe over. Cook the other side for another 20-30 seconds.
- Serve and Repeat: Slide the finished crepe onto a plate. You’re ready for the next one!
Pro Tips from the Depot: Secrets to a Perfect Crepe
Ready to take your skills from good to great? Here are a few secrets I’ve picked up over the years.
- Let Your Batter Rest: This is crucial. After mixing your batter, let it rest in the refrigerator for at least 30 minutes, or even overnight. This allows the gluten to relax and the flour to fully hydrate, resulting in a more tender and flavorful crepe.
- The First Crepe is a Lie: Never judge your skills by the first crepe. It’s almost always a test pancake. It’s the one you use to gauge the temperature and the amount of batter. Eat it, discard it, but don’t let it discourage you.
- Consistency is Key: Your batter should have the consistency of heavy cream. If it’s too thick, it won’t spread easily. If it’s too thin, it might tear. Add milk or water one tablespoon at a time to thin it, or a bit of flour to thicken it.
- Embrace the Bubbles: As the crepe cooks, you’ll see small bubbles form on the surface. This is a good sign! It means the crepe is cooking through and is almost ready to be flipped.
As our friend and celebrated pastry expert, Chef Amelia Davies, always says, “The soul of a perfect crepe is temperature. A quality crepe maker gives you the consistent, controlled heat that a simple pan never can. That control is the difference between a good crepe and a truly memorable one.”
How Do I Clean My Crepe Maker?
Keeping your crepe maker in top shape is easy and ensures it will last for years. The key is to clean it while it’s still slightly warm, but not hot.
Here’s a simple cleaning checklist:
- [ ] Unplug the machine and let it cool down until it’s just warm to the touch.
- [ ] Use a damp cloth or a soft sponge to wipe away any leftover crumbs or batter residue.
- [ ] For any stubborn spots, use a tiny bit of dish soap on your cloth, but be sure to wipe it clean with a fresh damp cloth afterward.
- [ ] Never submerge your electric crepe maker in water.
- [ ] Dry the surface completely before storing it.
Think Outside the Circle: More Than Just Crepes
One of the best things about a crepe maker is its versatility. The large, flat surface is perfect for a variety of other delicious foods!
- Pancakes and Blinis: Make perfectly round, evenly cooked pancakes every time.
- Tortillas: Warm up store-bought tortillas or even cook fresh homemade ones.
- Quesadillas: The large surface is ideal for making giant, cheesy quesadillas.
- Grilled Cheese: You can make a fantastic, evenly browned grilled cheese sandwich.
- Eggs: Fry eggs without them running all over the place.
You can explore our entire collection of [electric crepe makers] to see which model suits your creative cooking style.
Frequently Asked Questions
Q: What is the best temperature for making crepes?
A: A great starting point is around 375-400°F (190-200°C), or a medium-high setting. You may need to adjust slightly based on your specific batter recipe and machine, but this range generally produces a perfectly golden crepe.
Q: Why are my crepes sticking to the crepe maker?
A: This usually happens for two reasons: the surface isn’t hot enough when you pour the batter, or the non-stick surface needs a very light wipe of oil. Ensure the indicator light shows it’s fully preheated before you begin.
Q: Can I use whole wheat or gluten-free flour for my crepes?
A: Absolutely! However, alternative flours absorb liquid differently. You may need to adjust the batter’s consistency by adding a bit more liquid to get it to that ideal, pourable state. Experimentation is part of the fun!
Q: Is a bigger crepe maker always the better choice?
A: Not necessarily. A larger surface is great for impressive, large crepes but can be harder to store and requires more batter per crepe. A 12-13 inch model is often the most practical and versatile choice for most home kitchens.
Q: How long should I cook a crepe on each side?
A: It’s very quick! The first side typically takes 30-60 seconds, or until the edges look dry and start to curl. The second side needs even less time, usually just 20-30 seconds to lightly brown.
Your Holiday Kitchen’s New Best Friend
Investing in a quality machine, especially when you can take advantage of fantastic crepe maker holiday sale discounts, is one of the best moves you can make for your kitchen. It opens up a world of culinary possibilities, from sweet breakfast treats to savory dinner entrees. It’s more than just a tool; it’s an invitation to gather, create, and share delicious moments with the people you love. So, what are you waiting for? Your journey to crepe perfection starts now.
We’d love to hear about your crepe-making adventures! Share your favorite fillings or your first crepe-making experience in the comments below.