Imagine the delicate, paper-thin crepes you savor at a Parisian cafe – perfectly round, uniformly golden, and melt-in-your-mouth tender. Achieving this culinary feat at home, transforming simple batter into elegant crepes, might seem daunting. But with the right techniques, tools, and a touch of practice, you can elevate your crepe-making skills to rival those of a seasoned French chef. Forget thick, uneven pancakes; we’re about to unlock the secrets to spreading crepe batter thinly and flawlessly, ensuring every bite is a taste of authentic French indulgence.
Understanding Crepe Batter: The Foundation of Thinness
The journey to a perfect, thin crepe begins long before the batter hits the heat. Its consistency is paramount, acting as the very foundation for effortless spreading. Think of it as a delicate liquid dance, not a thick, sluggish waltz.
The Ideal Consistency: Liquid Gold
|
Our Picks for the Best Crepe maker in 2026
As an Amazon Associate I earn from qualifying purchases.
|
||
| Num | Product | Action |
|---|---|---|
| 1 | Moss & Stone Electric Crepe Maker 8 Inch, Portable Crepe Maker & Hot Plate Cooktop On/Off Switch, Nonstick Coating, Automatic Temperature Control, Easy To Use For Pancakes, Blintz, Chapati |

|
| 2 | Gourmia 12” Crepe Maker – Nonstick Electric Griddle for Pancakes, Omelets & More, Precise Temp Control with Indicator Lights, Includes Spatula & Batter Spreader, Quick Cleanup, Stainless Steel Trim |
|
| 3 | Nutrichef Electric Crepe Maker & Griddle Cooktop - Nonstick 12 Inch Aluminum Hot Plate with LED Indicator Lights & Adjustable Temperature Control - Wooden Spatula & Batter Spreader Included |
|
| 4 | Electric Crepe Maker 12'' & Griddle - Non-Stick Pan With Spreader for Roti, Tortilla, Blintzes, Pancakes - Adjustable Temperature, 1000W |
|
| 5 | Nutrichef Electric Crepe Maker - 8-inch Nonstick Cooktop with On/Off Switch - Cooks Roti, Tortillas & Pancakes - Automatic Temperature Control & Cool Touch Handle - Includes Food Bowl, Whisk & Spatula |
|
| 6 | Moss & Stone Electric Crepe Maker – 8” Portable Crepe Pan Nonstick with Dipping Plate, Auto Shut-Off, On/Off Switch, Even Heating & One Automatic Temperature Control – Compact Crepe Maker |
|
| 7 | Moss & Stone 12” Electric Griddle Pan & Crepe Machine, Non-Stick Electric Crepe Maker with Adjustable Temperature, Includes Spreader & Spatula – Ideal for Pancakes, Blintzes & Tortillas |
|
| 8 | Baker's Friend Instant Crepe Maker with Handle, Electric Crepe Maker Machine, Crepera Electrica, 8 Inch Non-stick Cooking Surface, Aqua |
|
| 9 | 16 Inch Commercial Crepe Maker, Dual-Head, Dual Zone Temp Setting, Nonstick Pancake Griddle Machine, 50-300°C(120-570℉), 3400W, S.S. Shell, for Catering, Restaurant, Snack Stand, CE Certified |
|
| 10 | Gourmia 8” Electric Crepe Maker – Nonstick Ceramic Surface, One-Touch Operation, Includes Batter Tray, Compact & Easy to Clean, Crepe, Pancake & Tortilla Maker |
|
French chefs swear by a batter that is remarkably thin—almost like heavy cream or even drinkable. This fluidity allows the batter to spread quickly and evenly across the hot surface, creating that signature translucent quality. If your batter feels thick or resists pouring easily, it’s likely too dense. This is a common hurdle, but one that’s simple to overcome by whisking in a tablespoon of milk at a time until you reach the desired pourable, smooth texture. Many professionals note that as batter sits, especially if refrigerated, it can thicken, requiring a slight thinning with extra milk as you progress through your batch.
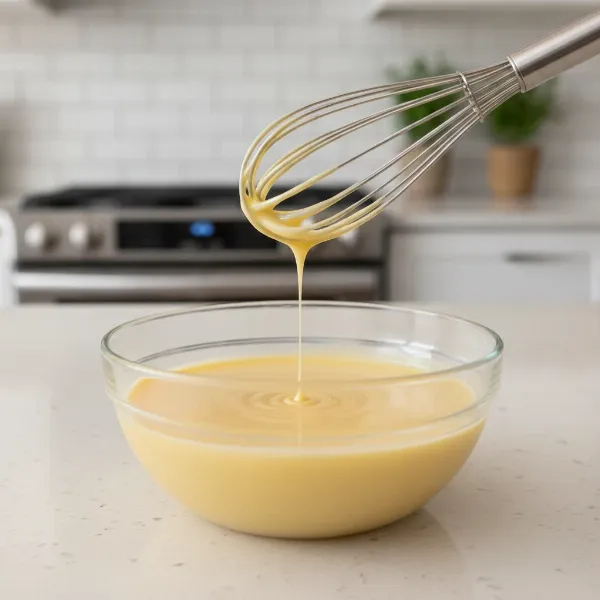 Thin crepe batter, similar to heavy cream, being poured or shown in a bowl.
The Magic of Resting Batter
While some home cooks skip this step, allowing your crepe batter to rest for at least 30 to 60 minutes, or even overnight in the refrigerator, is a game-changer. This resting period allows the flour to fully hydrate and the gluten to relax. The result is a more pliable, elastic batter that spreads smoothly without tearing, leading to crepes with a superior, delicate texture. It’s a small investment of time that pays off in remarkable crepe quality.
Essential Crepe Maker & Tools for Professional Spreading
While a skilled hand can work wonders, having the right equipment significantly streamlines the process and enhances your results. The tools you choose can transform your crepe-making experience from challenging to genuinely enjoyable.
Crepe Pans and Makers: Your Hot Canvas
The cooking surface is your canvas, and choosing the right one is crucial for spreading success.
- Electric Crepe Makers: These flat, round griddles offer consistent, controlled heat across the entire surface, making them ideal for achieving even cooking and spreading. Their large, open design provides ample space to maneuver a spreader.
- Traditional Crepe Pans: Characterized by their low, flared sides, these pans are designed specifically for crepes. They allow for easy access with a spreader and effortless flipping. Non-stick coatings are a popular choice for home cooks, while seasoned carbon steel or cast iron pans are often favored by professionals for their excellent heat retention and natural non-stick properties once properly maintained.
- Non-Stick Skillets: For the casual crepe maker, a good quality 8-inch or 10-inch non-stick skillet can certainly do the trick. The key is ensuring even heat distribution and a perfectly flat bottom.
Crepe Spreaders (Rozell): The Chef’s Wand
The “rozell,” as it’s known in French, is the iconic T-shaped tool that professionals use to create those perfect, uniform crepes. Mastering its use is central to achieving thinness.
- Flat vs. Round Spreaders:
- Round Spreaders: Often T-shaped, these are generally recommended for beginners. Their design inherently helps apply a light, even pressure as you guide them, making the motion more intuitive. Many seasoned cooks begin with a round spreader before transitioning.
- Flat Spreaders: These often have a thin, rectangular spreading edge. While more challenging to master, they allow for exceptionally thin crepes once you develop the nuanced touch required to control pressure. They are commonly seen in professional settings.
- Choosing the Right Size: The length of your spreader should correspond to your crepe maker’s diameter. For a 35 cm (approx. 14-inch) crepe maker, an 18 cm (approx. 7-inch) spreader is recommended. Larger griddles, such as 40 cm, might call for a 18-20 cm spreader, while 48 cm diameter surfaces could use a 20-22 cm tool. (Crepes Magiques search snippet, Source 4 of search 1)
- Ladles for Precision: A standard ladle or measuring cup, typically holding between 1/4 to 1/2 cup of batter, ensures consistent portions for each crepe, preventing you from accidentally making a thick pancake instead of a thin crepe.
Mastering the Art of Spreading: Step-by-Step Techniques
With your perfect batter and essential tools ready, it’s time to bring your crepe-making dreams to life. The technique is a dance of speed, lightness, and precision.
Preparing Your Crepe Station
Before you even pour, ensure your surface is primed for perfection.
- Optimal Pan Temperature: Preheat your crepe maker or pan to medium heat. A critical test involves flicking a tiny drop of water onto the surface: if it sizzles and evaporates instantly, it’s too hot; if it lies flat, it’s too cool. Aim for the water droplet to “dance” or bounce across the surface – that’s your sweet spot, around 200-220°C (390-430°F). (Crepe World, Source 1 of search 4) Too high a temperature will cause the batter to set before you can spread it, while too low will prevent even cooking.
- Lightly Greasing the Pan: For the first crepe, generously butter your pan, then wipe out any excess with a paper towel. For subsequent crepes, a very light greasing, often with a small amount of oil or butter wiped with a paper towel, is sufficient. Over-greasing can cause the batter to “float” and impede proper spreading.
Technique 1: The Spreader (Rozell) Method (French Chef Style)
This is the classic technique for achieving paper-thin, uniformly round crepes.
- Pour the Batter: Hold your ladle a few inches above the center of the hot pan and quickly pour the pre-measured batter (typically 1/4 to 1/2 cup, depending on pan size) directly into the middle. Let it settle for just one or two seconds.
- Position the Spreader: Immediately, set your chosen T-shaped spreader lightly on the puddle of batter. Imagine a tiny forward tilt. It’s crucial that one end of the spreader’s “T” remains anchored near the center of the batter circle as you begin.
- The Gentle Glide: “Keep pressure feather-light so you glide across the surface, not scrape it,” advises Gaby Buller, a French-inspired recipe creator. The motion should feel akin to polishing the pan—gentle yet steady. If you’re right-handed, start from the center and drag the spreader gently to the left, moving away from you in a counter-clockwise circle. Left-handed cooks should mirror this, dragging to the right in a clockwise motion.
- Widen the Circle: Without lifting the tool from the surface, continue the circular motion, gradually widening each pass to push the batter evenly towards the edges of the pan. Maintain that light pressure, ensuring an unbroken, thin layer.
- Smooth Finish: As you reach the rim of the pan, feather the last pass with an even sweep to smooth out any ridges. Lift the spreader straight up from where you started to avoid leaving a mark.
- Clean Your Spreader: For optimal results, wipe your spreader clean with a damp cloth or rinse it with warm water and dry it quickly between each crepe. This prevents sticky batter clumps from creating holes or unevenness in your next crepe.
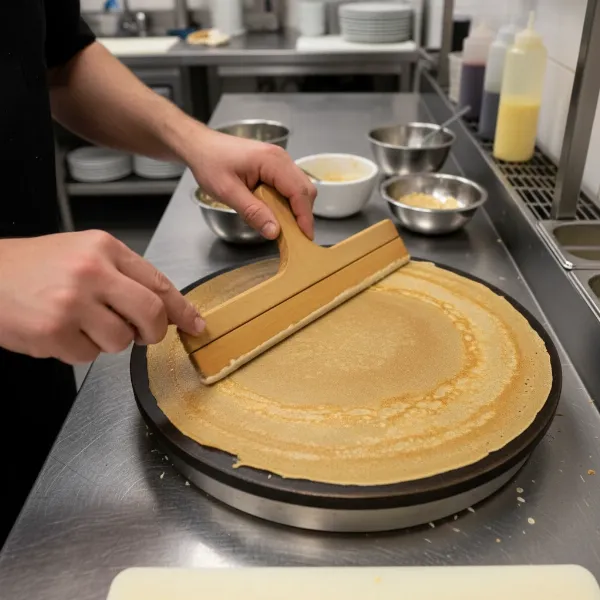 Chef using a T-shaped rozell to spread crepe batter thinly on an electric crepe maker.
Technique 2: The Pan Swirling Method (Home Cook Friendly)
If you don’t have a crepe spreader or are just starting out, the pan-swirling method is a popular and effective alternative.
- Pour and Swirl: Hold the preheated pan in one hand. Pour a small amount of batter (about 3-4 tablespoons) into the center of the pan.
- Tilt and Coat: Immediately lift the pan from the heat and quickly tilt and swirl it in a circular motion. This action allows gravity and momentum to spread the batter out into a thin, even layer across the entire bottom surface.
- Return Excess (Optional): Some chefs even advocate pouring in more batter than needed, swirling it once to coat, and then immediately tipping the pan to pour any excess batter back into your bowl. This ensures an ultra-thin coating.
Once the batter is spread, whether by spreader or swirling, return the pan to medium heat and cook for 45-90 seconds until the surface looks set and the edges are lightly golden and begin to lift. Use a thin, wide spatula to carefully slide under the edge, lift, and flip. Cook for another 10-20 seconds on the second side, then transfer your perfect crepe to a plate.
Common Spreading Mistakes and How to Avoid Them
Even with the best intentions, tiny missteps can derail your crepe-making aspirations. Understanding these common errors will help you troubleshoot and achieve consistently excellent results.
- Batter Too Thick or Thin: If your crepes are coming out like fluffy pancakes, your batter is too thick. Thin it with a tablespoon of milk at a time. If they tear easily or have excessive holes, the batter might be too thin and lack structure.
- Pan Temperature is Off: A pan that’s too hot will cook the batter before you can spread it, resulting in thick, lumpy spots. A pan that’s too cool will yield pale, rubbery crepes that don’t brown evenly. Always check the temperature as described in the “Preparing Your Crepe Station” section.
- Pressing Too Hard with the Spreader: “Do not press down on the crêpe spreader,” warns Gaby Buller. “This will lead to tears in your crêpes.” The spreader should glide effortlessly over the surface, gently guiding the batter, not scraping it.
- Not Working Quickly Enough: Crepe batter sets rapidly on a hot surface. Hesitation means the batter will begin to cook before you’ve finished spreading, leading to uneven thickness. Speed and confidence are key.
- Over-Greasing the Pan: While some grease is necessary, an excessive amount of oil or butter will cause the batter to slide around excessively, making it difficult to control with a spreader and preventing it from adhering to the pan long enough to spread thinly.
- Dirty Spreader: Batter can clump on a spreader, especially if it’s not cleaned between uses. These clumps can drag across the crepe, creating streaks, holes, or uneven patches. A quick wipe with a damp cloth keeps your spreader ready for action.
Pro Tips for Paper-Thin Crepes Every Time
Becoming a crepe master isn’t about innate talent; it’s about intentional practice and smart adjustments.
- Practice Makes Perfect: Don’t get discouraged by your first few attempts. They might not be picture-perfect, but they will still be delicious! Each crepe is a learning opportunity, and you’ll quickly develop the muscle memory for the spreading motion.
- Adjust as You Go: Pay attention to how your crepes are cooking. If they’re browning too fast, slightly lower the heat. If the batter seems to be thickening, add a touch more milk. Your experience is your best guide.
- Keep Crepes Warm: As you cook multiple crepes, stack them on a plate and cover them with a clean kitchen towel or an overturned plate. The residual heat will keep them warm and pliable until you’re ready to serve.
Conclusion
Achieving those coveted paper-thin crepes, a hallmark of French culinary artistry, is truly within your reach. By focusing on a properly thin and rested batter, utilizing the right crepe maker and spreading tools, and practicing the delicate art of the “rozell” or pan swirl, you’ll transform your kitchen into a Parisian creperie. Remember, the journey to mastering the perfect crepe is as much about enjoyment and embracing the process as it is about the final delicious result. So, grab your crepe maker, prepare your batter, and get ready to impress with crepes that are as elegant as they are irresistible. What delightful fillings will you choose to crown your perfectly thin creations first?
Frequently Asked Questions
What makes French crepes so thin?
French crepes are exceptionally thin primarily due to their very liquid batter, which lacks leavening agents found in pancakes. This allows the batter to spread easily into a delicate, almost translucent layer on a hot surface, cooking quickly to achieve that signature lacy texture.
Do I need a special crepe maker to make thin crepes?
While a dedicated Crepe Maker or a low-sided crepe pan can make spreading easier and more consistent, you can still achieve thin crepes using a good quality non-stick skillet. The key is to manage heat effectively and use a thin batter, whether you employ a spreader or the pan-swirling technique.
How do I prevent my crepe batter from tearing when spreading?
Tearing often indicates either a batter that’s too thin or applying too much pressure with your spreader. Ensure your batter has enough structure by resting it, and practice using a feather-light touch with your spreader, gently gliding rather than scraping the surface.
What is the ideal temperature for cooking crepes?
Medium heat is generally ideal. If the pan is too hot, the batter sets too quickly before you can spread it. If it’s too cool, the crepe will be pale and won’t cook evenly. Test by flicking a water droplet; it should dance and evaporate, indicating optimal heat.
Can I make crepes without a wooden spreader?
Yes, you can make thin crepes without a wooden spreader. The “pan swirling” method involves pouring a small amount of batter into the center of the pan and quickly tilting and rotating the pan to spread the batter into an even, thin layer before it sets.