Hello, fellow crepe enthusiast! Welcome to the heart of Crepe Maker Depot. It’s me, your guide, and honestly, your biggest fan in the kitchen. Let’s talk about that magical moment: a perfectly thin, golden-brown crepe, ready to be filled with your favorite things. But let’s be real, getting there can feel like a bit of a battle. You’ve seen those videos of street vendors in Paris, effortlessly gliding a wooden tool to create a flawless circle. The secret isn’t magic; it’s technique. And today, we’re going to demystify how to use a crepe spreader properly and turn your crepe-making game from amateur to absolute artisan.
This isn’t just about a tool; it’s about the dance between the batter, the heat, and your hand. Mastering this simple utensil is the single biggest step you can take toward crepe perfection. So, grab your apron, and let’s get swirling. If you’re looking for the foundational knowledge of the entire process, understanding the basics of how to make crepes with crepe maker is a fantastic starting point for our journey today.
What Exactly Is a Crepe Maker, Anyway?
Before we dive into the spreader, let’s talk about the stage where the magic happens: the crepe maker. What is it and why do you need one?
A crepe maker is a dedicated cooking appliance with a large, flat, and typically non-stick circular surface designed for one primary purpose: creating incredible crepes. Unlike a standard frying pan, its low or non-existent edges allow you to get in there with your spreader and spatula without any obstruction. It’s all about providing a perfectly even, consistent heat source, which is the unsung hero behind a crepe that doesn’t burn in one spot and stay raw in another.
The Tools of the Trade: Choosing Your Crepe Maker
You’ll find two main contenders in the crepe-making world, each with its own personality.
Electric Crepe Makers
These are countertop workhorses. You plug them in, set the temperature, and you get a consistent, reliable heat across the entire surface. They’re fantastic for beginners because they remove the guesswork of stovetop heat management. Many even come as a kit with the essential spreader and a long, thin spatula.
Traditional Crepe Pans
These are essentially large, shallow pans, often made of cast iron, carbon steel, or non-stick aluminum. They work on your stovetop, giving you a bit more versatility but also requiring more skill to maintain the right temperature. A seasoned cast iron crepe pan is a thing of beauty, but it demands a little more love and care.
| Feature | Electric Crepe Maker | Traditional Crepe Pan |
|---|---|---|
| Heat Source | Internal electric element | Stovetop (gas, electric, induction) |
| Heat Control | Precise thermostat | Manual, requires practice |
| Ease of Use | Very beginner-friendly | Moderate learning curve |
| Portability | Less portable, needs outlet | Very portable, works anywhere |
| Best For | Consistency and ease | Versatility and traditionalists |
The Main Event: How to Use a Crepe Spreader Properly
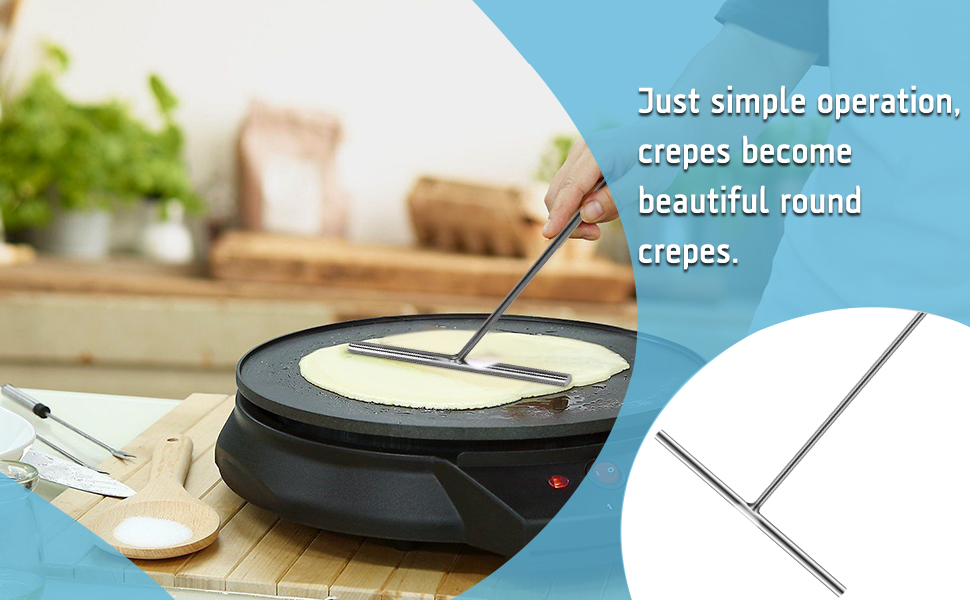
Alright, here we are. This is the moment that separates the lumpy pancakes from the sublime crepes. The crepe spreader, often called a “rateau” in French, looks like a small T-shaped rake. Its job is to distribute the batter into a thin, even layer.
“The spreader is an extension of your hand. The goal is a light, confident touch. You’re not pushing the batter; you’re guiding it.” – Pastry Chef Elodie Bernard
Here’s how to master it, step by step.
Step 1: Prep Your Spreader (Yes, It’s a Thing!)
If you’re using a traditional wooden spreader, this is non-negotiable. Before its first use, and for a few seconds before each crepe-making session, you need to soak the end of the spreader in a glass of water. Why? A wet spreader glides over the batter instead of sticking to it and dragging it. A dry wooden spreader is the number one cause of crepe-tastrophes. Just a quick dip and a light shake is all it takes.
Step 2: The Perfect Pour
Once your crepe maker is preheated to a medium temperature (around 375-400°F or 190-200°C), it’s time for the batter. For a standard 12-inch crepe, you’ll need about 1/3 cup of batter. Pour it directly into the center of the cooking surface in one confident puddle. Don’t hesitate!
Step 3: The Magical Swirl – A Step-by-Step Guide
This is where the muscle memory kicks in. Don’t worry, you’ll get the hang of it faster than you think.
- Land the Spreader: Immediately after pouring the batter, place the flat edge of your wet spreader in the very center of the puddle. Hold it lightly, like you’d hold a pencil.
- Apply Gentle Pressure: Apply just enough pressure for the spreader to make contact with the surface through the batter. You should feel a slight resistance.
- Begin the Swirl: In one smooth, continuous motion, pivot the spreader from the center outwards, spinning it in a circle. Think of the needle on a record player. Your goal is to guide the expanding edge of the batter puddle.
- Maintain the Motion: Keep the motion fluid and the pressure even. Don’t stop and start. As you circle around, you’ll create a perfect, paper-thin layer of batter.
- Lift Off: Once you’ve completed a full circle and the surface is covered, cleanly lift the spreader off the crepe.
Pro-Tip: Don’t try to go over a spot you’ve already spread. The batter starts cooking instantly, and trying to “fix” a spot will likely just tear the delicate crepe. Remember the crepe-maker’s mantra: the first one is always for the chef! It’s your practice round.
Pro Tips from the Depot for Flawless Crepes Every Time
- Batter Consistency is King: Your crepe batter should have the consistency of heavy cream. Too thick, and it won’t spread. Too thin, and it will be fragile and might create holes. For some truly inspired ideas, check out the best crepe recipes 2025 we’ve curated.
- Let Your Batter Rest: After mixing, let your batter rest in the fridge for at least 30 minutes. This allows the gluten to relax and the flour to fully hydrate, resulting in a more tender, less rubbery crepe.
- The Art of the Flip: Once the edges start to lift and the surface looks dry (about 30-60 seconds), it’s time to flip. Slide a long, thin spatula (an offset spatula is perfect) all the way underneath and flip it over with a confident flick of the wrist. The second side only needs about 20-30 seconds.
- Folding Finesse: The way you present your crepe matters! From a simple half-moon to an elegant triangle, learning how to fold a crepe adds that final professional touch.
Keeping Your Gear in Top Shape: Cleaning and Maintenance
Proper care ensures your crepe maker and tools will last for years.
For the Crepe Maker:
- Always let it cool down completely.
- Wipe the surface with a damp, soft cloth or paper towel.
- For stubborn bits, use a little oil on a paper towel and gently rub the spot while the surface is still slightly warm.
- Never use abrasive scrubbers, steel wool, or harsh cleaning chemicals on a non-stick surface. You’ll ruin the coating.
For the Spreader:
- Wooden: Simply rinse with warm water immediately after use and let it air dry completely. Don’t put it in the dishwasher or let it soak for long periods.
- Stainless Steel: This one can go right in the dishwasher. Easy peasy.
Thinking Outside the Circle: What Else Can You Make?
Your crepe maker is more versatile than you think! The large, even heating surface is perfect for many other breakfast favorites. A very popular alternative is learning how to make eggs on a crepe maker, which cooks them perfectly with no hot spots. You can also use it for:
- Pancakes and blinis
- Flour tortillas
- Quesadillas
- Grilling sandwiches
And for those with a truly adventurous palate, exploring creative fusions like learning how to make bubble tea crepes can open up a whole new world of flavor.
Frequently Asked Questions
Why is my crepe sticking to the spreader?
Your spreader is likely too dry, especially if it’s wooden. Make sure to dip it in water for a second right before you start to spread each crepe. This creates a non-stick barrier of steam and water.
What is the best temperature for making crepes?
A medium to medium-high heat is ideal, typically around 375°F (190°C). If it’s too hot, the batter will cook before you can spread it. If it’s too cool, the crepe will be pale and tough.
Why are my crepes tearing when I try to spread the batter?
This can happen for a few reasons. Your pressure might be too heavy, the spreader could be dry, or your batter might be a little too thick. Try a lighter touch, a wet spreader, and thinning your batter with a tablespoon of milk or water.
How do I know when to flip the crepe?
Look for the visual cues. The surface of the crepe will change from shiny and wet to matte and dry. The edges will also begin to crisp up slightly and may even lift away from the cooking surface on their own.
Can I use oil or butter on my non-stick crepe maker?
Generally, you don’t need to. A good non-stick surface is designed to work without added fat. If you feel you need a little something, a very light wipe with a paper towel dipped in a neutral oil is more than enough. Too much butter can burn and affect the taste.
Your Journey to Crepe Mastery
There you have it—the secrets are unlocked. The path to the perfect crepe isn’t about expensive gear or complicated recipes. It’s about understanding the fundamentals and mastering the elegant swirl. Learning how to use a crepe spreader properly is your ticket to that Parisian-style perfection right in your own kitchen.
It’s a skill, and like any skill, it takes a little practice. So be patient with yourself, embrace that “first pancake” rule, and have fun with it. Soon enough, that smooth, confident motion will be second nature. Now go forth and create something delicious! We’d love to hear about your creations and experiences in the comments below.