In a world where kitchen appliances often serve a single purpose, discovering new ways to utilize your existing tools is a true culinary delight. For those who cherish their crepe maker for its reliable, even heat and non-stick surface, get ready to expand its repertoire. Beyond delicate crepes and savory galettes, your crepe maker is an unsung hero capable of producing some of the most satisfying, perfectly griddled English muffins you’ll ever taste. This guide will transform your breakfast routine, leveraging the precise control of your crepe maker to achieve those iconic nooks and crannies every time.
Imagine the aroma of freshly baked English muffins wafting through your kitchen, ready to be split, toasted, and slathered with butter or jam. While traditionally cooked on a griddle or in a skillet, the modern crepe maker offers an unparalleled advantage: consistent, controllable heat across a wide, flat surface. This makes it an ideal platform for achieving the signature texture and golden-brown crust of homemade English muffins, without the need for a conventional oven. Say goodbye to store-bought varieties and hello to superior flavor and freshness, all thanks to the humble crepe maker.
Why Your Crepe Maker is the Secret Weapon for English Muffins
English muffins aren’t baked in the traditional sense; they’re griddled, which means they cook directly on a hot, flat surface. This cooking method is precisely where your crepe maker shines.
- Consistent, Even Heat: Crepe makers are designed for uniform heat distribution across their entire surface, preventing hot spots that can lead to uneven cooking. This is crucial for English muffins, ensuring each one cooks through perfectly and develops an even golden-brown exterior.
- Precise Temperature Control: Most crepe makers offer adjustable temperature settings, allowing you to maintain the low-to-medium heat required for English muffins. This control is vital to cook the muffins slowly, allowing them to rise and develop their internal structure without burning the outside.
- Non-Stick Surface: The non-stick coating on most crepe makers ensures that your English muffins won’t adhere to the surface, making flipping easy and cleanup a breeze. This also means you can often cook them with minimal or no added oil, contributing to a healthier finish.
- Dedicated Flat Surface: Unlike a multi-purpose skillet or griddle that might have ridges or varying thickness, a crepe maker provides a perfectly flat plane, ideal for the consistent shaping and cooking of English muffins. It’s an alternative use that truly maximizes the utility of your appliance.
The Essential Ingredients for Homemade English Muffins
Crafting delicious English muffins starts with a few basic, high-quality ingredients. Here’s what you’ll need for a classic batch:
- All-Purpose Flour: The foundation of your muffins. Bread flour can also be used for a chewier texture.
- Active Dry Yeast: The leavening agent responsible for that airy, pillowy interior. Ensure it’s fresh and active.
- Warm Milk: Provides moisture and helps activate the yeast. Keep it lukewarm (around 105-115°F or 40-46°C) to avoid killing the yeast.
- Butter: Adds richness and tenderness to the dough.
- Sugar: A touch of sweetness and food for the yeast.
- Salt: Balances the flavors and strengthens the dough structure.
- Cornmeal: Absolutely essential for dusting the work surface and the muffins themselves. It prevents sticking and gives English muffins their distinctive, slightly gritty bottom texture.
Step-by-Step Guide: Crafting English Muffins on Your Crepe Maker
Making English muffins might seem daunting, but with a crepe maker, the process becomes incredibly manageable. Follow these steps for perfect results.
Phase 1: Preparing the Dough
Whether you prefer the ease of a bread machine or the hands-on satisfaction of kneading, your dough preparation is the first critical step.
- Activate the Yeast: In a small bowl, combine warm milk, a pinch of sugar, and the active dry yeast. Let it sit for 5-10 minutes until foamy, indicating the yeast is active.
- Combine Ingredients: In a large mixing bowl (or your bread machine pan), add the flour, remaining sugar, and salt. If using a bread machine, follow its specific order for liquid and dry ingredients.
- Mix the Dough: Add the activated yeast mixture and melted butter to your dry ingredients.
- Hand-Kneading: Mix until a shaggy dough forms, then turn it out onto a lightly floured surface. Knead for 8-10 minutes until the dough is smooth and elastic. It should be soft but not overly sticky.
- Bread Machine: Set your bread machine to the “dough” cycle. This will handle all the mixing and initial kneading for you.
Our Picks for the Best Crepe maker in 2026As an Amazon Associate I earn from qualifying purchases.Num Product Action 1 Gourmia 12” Crepe Maker – Nonstick Electric Griddle for Pancakes, Omelets & More, Precise Temp Control with Indicator Lights, Includes Spatula & Batter Spreader, Quick Cleanup, Stainless Steel Trim 
2 Moss & Stone Electric Crepe Maker 8 Inch, Portable Crepe Maker & Hot Plate Cooktop On/Off Switch, Nonstick Coating, Automatic Temperature Control, Easy To Use For Pancakes, Blintz, Chapati
3 Electric Crepe Maker 12'' & Griddle - Non-Stick Pan With Spreader for Roti, Tortilla, Blintzes, Pancakes - Adjustable Temperature, 1000W
4 Baker's Friend Instant Crepe Maker with Handle, Electric Crepe Maker Machine, Crepera Electrica, 8 Inch Non-stick Cooking Surface, Aqua
5 Moss & Stone 12” Electric Griddle Pan & Crepe Machine, Non-Stick Electric Crepe Maker with Adjustable Temperature, Includes Spreader & Spatula – Ideal for Pancakes, Blintzes & Tortillas
6 Nutrichef Electric Crepe Maker & Griddle Cooktop - Nonstick 12 Inch Aluminum Hot Plate with LED Indicator Lights & Adjustable Temperature Control - Wooden Spatula & Batter Spreader Included
7 Nutrichef Electric Crepe Maker - 8-inch Nonstick Cooktop with On/Off Switch - Cooks Roti, Tortillas & Pancakes - Automatic Temperature Control & Cool Touch Handle - Includes Food Bowl, Whisk & Spatula
8 Moss & Stone Electric Crepe Maker – 8” Portable Crepe Pan Nonstick with Dipping Plate, Auto Shut-Off, On/Off Switch, Even Heating & One Automatic Temperature Control – Compact Crepe Maker
9 Gourmia 8” Electric Crepe Maker – Nonstick Ceramic Surface, One-Touch Operation, Includes Batter Tray, Compact & Easy to Clean, Crepe, Pancake & Tortilla Maker
10 16 Inch Commercial Crepe Maker, Dual-Head, Dual Zone Temp Setting, Nonstick Pancake Griddle Machine, 50-300°C(120-570℉), 3400W, S.S. Shell, for Catering, Restaurant, Snack Stand, CE Certified
- First Rise (Bulk Fermentation): Place the dough in a lightly oiled bowl, turning once to coat. Cover the bowl with plastic wrap or a clean kitchen towel and let it rise in a warm place for 1-2 hours, or until doubled in size. A slower rise, even overnight in the refrigerator, can enhance flavor and texture.
Phase 2: Shaping and Proofing
This phase is where your English muffins truly take shape and develop their characteristic look.
- Prepare Work Surface: Liberally sprinkle your work surface with cornmeal. This is vital for the signature English muffin exterior.
- Deflate and Roll: Gently punch down the risen dough to release the air. Turn it out onto the cornmeal-dusted surface. Pat or roll the dough into a rectangle or circle about 1/2 to 3/4 inch thick. Avoid rolling too thin.
- Cut the Muffins: Use a 3-inch round cookie cutter or the rim of a wide-mouth jar to cut out individual English muffins. Dip the cutter in cornmeal between cuts to prevent sticking. Gather any dough scraps, gently re-knead them, and cut more muffins until all the dough is used.
- Second Rise (Proofing): Carefully transfer the shaped muffins to a baking sheet lined with parchment paper and heavily dusted with cornmeal. Sprinkle more cornmeal generously over the tops of the muffins. Cover them lightly with a clean kitchen towel or plastic wrap and let them rise for another 20-30 minutes, or until they look visibly puffy and almost doubled in size. This crucial step contributes to the internal “nooks and crannies.”
 Round English muffin dough pieces proofing on a surface dusted with cornmeal, ready for cooking.
Phase 3: Griddling on the Crepe Maker
Now for the star of the show: cooking your English muffins on the crepe maker.
- Preheat Your Crepe Maker: Turn your crepe maker to a low to medium-low setting, aiming for a surface temperature between 300-350°F (150-175°C). Allow it to preheat thoroughly for several minutes to ensure even heat. You want a steady, gentle heat.
- Place the Muffins: Carefully transfer the proofed English muffins onto the preheated crepe maker. Do not overcrowd; leave at least an inch of space between each muffin to allow for even cooking and easy flipping. Depending on your crepe maker size, you may need to cook in batches.
- Cook First Side: Cook for 5-7 minutes on the first side. The surface should be a dry cook, so avoid adding oil to the crepe maker surface itself, though a very light spray of cooking oil can be used if your non-stick isn’t perfect. Watch for the bottoms to turn a beautiful golden-brown. For a softer interior and more rise, you can loosely cover the muffins with a dome or inverted pot lid to trap some steam during the initial cooking.
- Flip and Cook Second Side: Gently flip the muffins and cook for another 5-7 minutes on the second side, until both sides are golden-brown and the muffins are cooked through. The internal temperature should reach around 200-210°F (93-99°C). If you find they are browning too quickly, lower the heat slightly.
- Cool: Once cooked, transfer the English muffins to a wire rack to cool slightly.
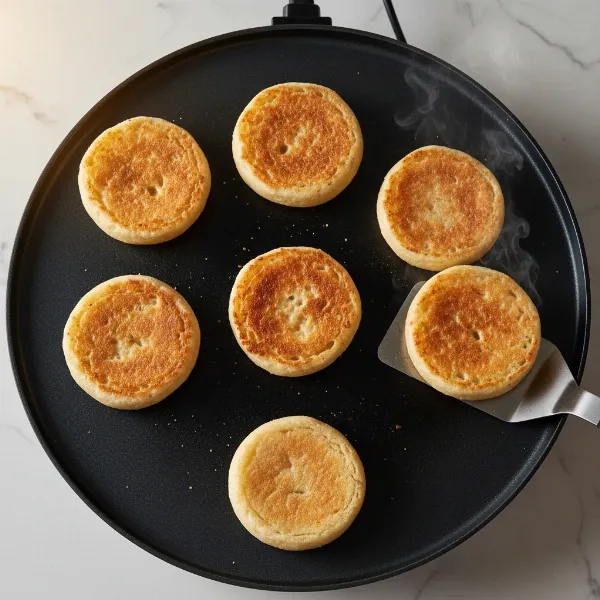 Several golden-brown English muffins griddling on a hot, non-stick crepe maker surface.
Tips from a Crepe Maker Expert for Flawless English Muffins
As someone with over a decade of experience with crepe makers, I’ve learned a few tricks that can elevate your English muffin game:
- Mastering Low Heat is Paramount: The biggest mistake people make is cooking English muffins over too high heat. This will burn the exterior before the interior has a chance to cook through and develop its airy texture. Your crepe maker’s precise temperature dial is your best friend here; start low and be patient.
- Don’t Overcrowd the Surface: Give your muffins room to breathe and cook evenly. Overcrowding lowers the surface temperature and can lead to uneven browning and a steamed, rather than griddled, texture.
- The Fork-Split Secret to Nooks and Crannies: To get those quintessential “nooks and crannies,” resist the urge to cut your English muffins with a knife. Instead, use a fork to gently pry them apart around the circumference. This preserves the uneven, craggy interior that’s perfect for holding butter and jam.
- Cornmeal is Not Optional: It’s more than just a coating; cornmeal contributes to the unique texture and slight crunch of English muffins. Don’t be shy when dusting your work surface and the dough itself.
- Know Your Appliance: Every crepe maker has its quirks. Some run hotter, others maintain heat more consistently. Take note of how your specific model performs during the first batch and adjust cooking times or temperatures for subsequent batches to achieve perfection. This hands-on understanding is invaluable.
“The beauty of a crepe maker for English muffins lies in its consistent, controllable heat. It’s a game-changer for achieving that perfect golden crust and fluffy interior, turning a specialty item into an everyday luxury.” – Admin, CrepeMakerDepot.com
Serving Suggestions
Once cooled, your homemade English muffins are ready to be enjoyed!
- Classic Toasting: Split them with a fork, toast until golden, and slather with butter and your favorite jam or marmalade.
- Breakfast Sandwiches: They are the ideal base for eggs, cheese, and bacon or sausage.
- Eggs Benedict: The ultimate foundation for this brunch classic.
- Sweet Treat: A drizzle of honey or a sprinkle of cinnamon sugar can turn them into a delightful snack.
Troubleshooting Common English Muffin Challenges
Even with the right tools, baking can have its moments. Here are solutions to common issues:
- Muffins are Too Dense: This often indicates old or inactive yeast, under-proofing (not letting them rise long enough), or too much flour. Ensure your yeast is fresh, the dough is slightly sticky but workable, and allow ample time for both rises.
- Burning Outside, Raw Inside: The heat is too high! Lower your crepe maker’s temperature. Remember, slow and steady wins the race with English muffins. Covering them with a lid during cooking can also help trap steam to cook the interior more thoroughly.
- Not Enough Nooks and Crannies: This is usually due to improper handling, over-kneading, or cutting instead of fork-splitting. Handle the dough gently to preserve air bubbles, and always use a fork to split. A longer, colder first rise can also help develop a more open crumb.
Conclusion
Who knew your beloved crepe maker could be such a versatile workhorse, extending its capabilities far beyond delicate pancakes? By leveraging its precise heat control and ample cooking surface, you can confidently create delectable homemade English muffins with that irresistible balance of crispy exterior and airy, nooks-and-crannies-filled interior. This culinary hack not only proves the adaptability of your kitchen appliances but also elevates your breakfast game to a professional level. So, dust off that crepe maker, gather your ingredients, and prepare to impress yourself and your loved ones with a batch of these extraordinary griddled delights. What other unexpected culinary creations might your crepe maker be capable of?
Frequently Asked Questions
Can any crepe maker be used for English muffins?
Yes, most electric crepe makers with adjustable temperature control and a flat, non-stick surface are suitable for making English muffins. The key is maintaining a consistent low-to-medium heat.
Do I need special rings to make English muffins on a crepe maker?
While English muffin rings can help achieve perfectly uniform rounds and some height, they are not strictly necessary. You can simply cut the dough into discs and place them directly on the crepe maker.
How do I know when my English muffins are fully cooked?
English muffins are done when both sides are golden brown and they feel light and springy to the touch. For absolute certainty, the internal temperature should reach 200-210°F (93-99°C).
Can I prepare English muffin dough ahead of time?
Absolutely! Many recipes recommend a slow, cold first rise in the refrigerator overnight or for up to four days. This develops a deeper flavor and improves the texture of the muffins. Just bring the dough to room temperature before shaping.
What is the best way to store homemade English muffins?
Store cooled English muffins in an airtight container at room temperature for 2-3 days, or in the refrigerator for up to a week. They also freeze exceptionally well for up to 3 months; simply thaw and toast before serving.